
In our last article, we created email addresses for 17 Demo Members. Five Demo Members were registered by the Super User on the back end of our website. In this article, we will assign one of these 7 members to an additional default user group to see how the default Joomla User Management system works. Then in the next article, we will review how to use Joomla Access Levels in combination with Joomla User groups.
We will then create a new custom user group called Services Providers which we will use to give special permissions to our Service Provider members. We can then use our Custom Registration form to create accounts for 6 new members of our Demo Network and assign them to the Services Providers group. We can then see how the Fabrik Search Function works.
#1 Assign the Newsletter Coordinator to the Author User Group
To better understand how the default Joomla User Management system works, log in as a Super User and click on the Users menu item. Then click on the Newsletter Coordinator to open the Edit screen. Then click on the Assigned User Groups tab:
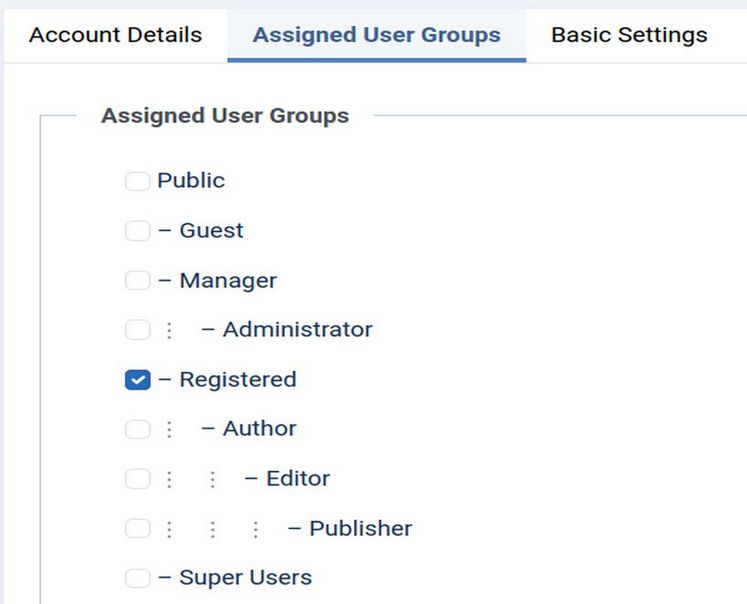
We can see that any registered user is automatically placed in the Registered User group. Check the box for Author. Then click Save and Close. This person now belongs to two groups – the Registered group and the Author group.

#2 Make a Member Log In Menu Item
Next go too Content, Articles to create a new article called Member Log In. Type:
If you are already a member of our group, use the form below to log into our community network. If you are not yet a member of our group, go to our Member Sign Up page to join our group!
Then click Save and Close. Then go to Menu, Main Menu, New to create a new menu item for this article. Then go to Content, Site Modules and click on the Log In Module to edit it. Put it in the Helix Bottom 1 position. Click Publish. Then click on the Menu Assignment tab and click Only on the pages selected. Then click None. Then click the Member Log In Menu item. Then click Save and Close.
Also Make a Member Logout Menu Item
We need a way for logged in Members to log out. Go to Menu, Main Menu, New to create a new menu item. For Type, select Users, Logout. For Title, type Logout. For Access, click Registered. Then click Save and Close.
#3 Make a Create Article Menu Item
Before this person can create any articles, we need to create a new special menu item for the front end of our website that is only visible to those above the rank of registered user. Click on the Menus, Main Menu, New Menu Item. For Menu Item type, select Articles, Create Article. For title, type Create Article. For access, go to the lower right corner of the screen and assign this menu item to the “Special” Access group (which we will review later). Then click Save and Close.
#4 Create Categories for 3 Service Provider Categories
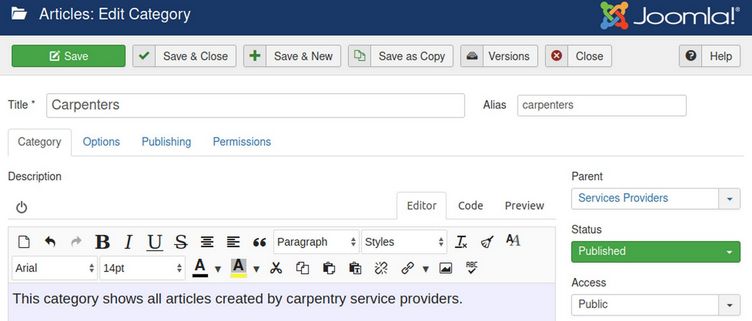
Authors can and should assign their articles to a category. For this to happen, the category needs to exist before the author creates their article. We will therefore go to Content Categories and create a category called Service Providers.
Here is the description:
This is a top level category that contains all Service Provider categories.
In that category, we will create 3 new categories called Carpenters, Plumbers and Teachers. Here is the description for the Carpenters category:
This category shows all articles created by Plumbers service providers.
Assign each Service Category to be a child of the Parent category called Services Providers.
#4 Create Menu Items for the 4 New Categories
Create new menu items of the type Category List for the Services Provider category with Access to this menu item only viewable by Registered Members. Then create new menu items of the type Category List for the Carpenter, Plumber and Teacher categories which each menu item only viewable by Registered Members and each menu item under the Services Provider parent menu item.
#5 Log in as the Newsletter Coordinator to create a new article
Open a new browser tab and click on the Log In menu item. Then log into the front end of our website as that Newsletter Coordinator. Their username is newsletter1.
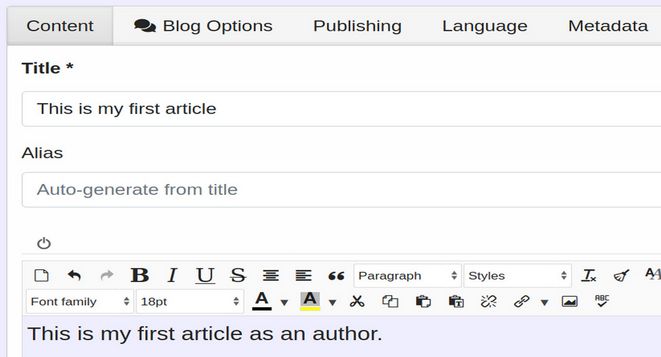
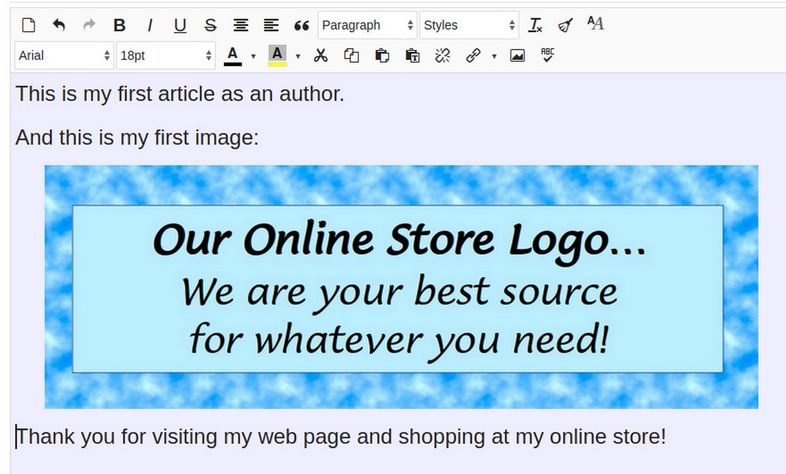
You will now see a Menu Item on the Main Menu that says Create Article. Click on it to bring up the Article New screen. Give the article a Title such as This is my first article. Then type some text into the Editor screen such as This is my first article as an author.
Depending on our JCE Editor settings, authors may or may not have access to the Website Media Manager. It is a huge problem if authors have access to the Main Media Manager. We have previously covered how to create separate folders for each author to keep their own images in their own folders.
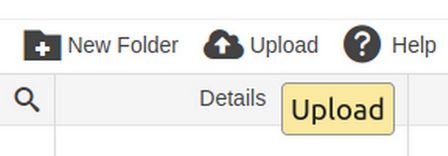
Let’s see how well this function works. First create two or three sentences. Then create a new line between the sentences and place your cursor at the beginning of this new line. Then, to add an image to the article, click on the JCE editor Picture icon. If the JCE editor is set up properly, you will not see any images or image folders.
Then in the JCE Images Manager, click on the Upload icon which is just above the Details area:
Then open your Home computer file manager and select an image which is under 100 kb and drag it into the JCE Upload box.
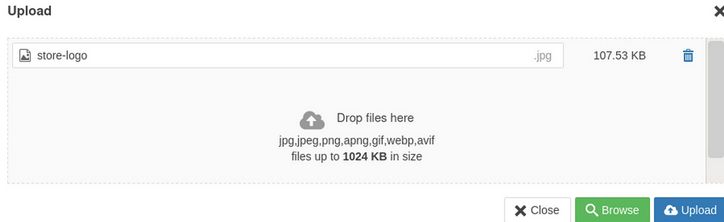
Then click Upload. Then click on the file to the right of the checkmark to see and adjust its properties:
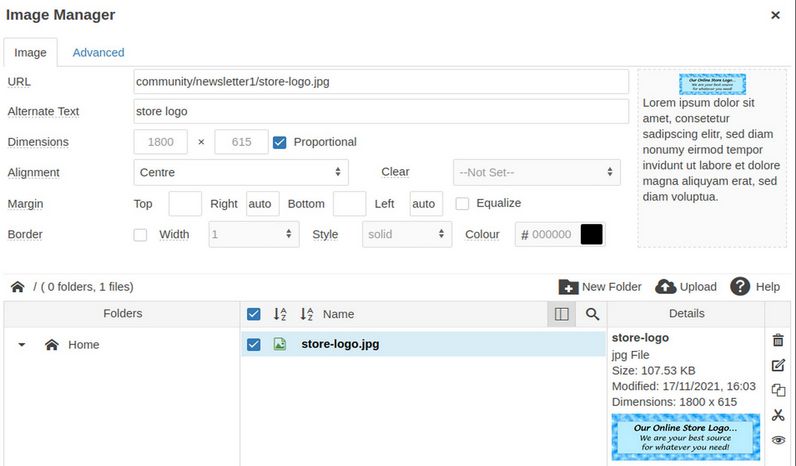
In the Dimensions box, reduce its width from 1800 to 800 pixels.
Then click the Insert button in the lower right corner of the screen.
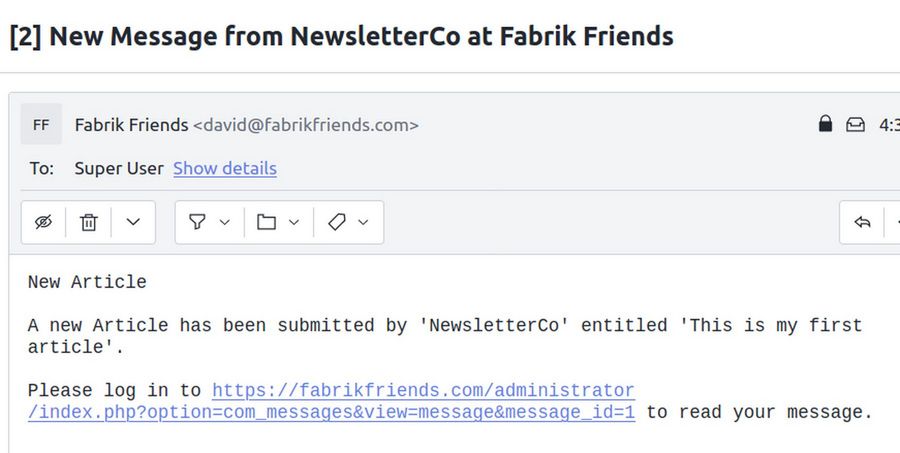
Next click on the Publishing tab where you can assign your article to a category. Scroll down to Service Providers and click Teachers. As for Access, leave it for Public as we will use a different method to control Access to our Service Provider page. Then click Save. This will close your article and return you to the Home page. A popup will appear that says: Article Submitted. In addition, an email will be sent to the Site Administrator letting them know that an article was submitted and is waiting for approval:
#6 How to Edit Submitted Articles
Let’s say you want to add more information, images, videos or links to your article. Sadly, if you go back to Create Article, Publishing tab and select your category, the article is not shown. This is because it has not yet been published. Log into the control panel as the super user and click on Content Articles where you will see the unpublished new article. Click it to review it to make sure the content is OK. Then select it and click Publish. Then log into the front end as the person who created the article (in this case, the newsletter coordinator). Go to the category where you placed the article and you will see the article with an Edit button to the right of it. Click on the Edit button to open the article to editing.

Next, assign a different member such as the Events Coordinator to be an author. Then log in as this member. When they go to the same category, they can see the article but not edit it.
Sadly, an author can not delete an article. To delete your article, you will need to contact someone who is a super user or was the person who published the article.
Next, log in as a super user and assign a user to the Publisher user group. Then click on Create Article in the Main Menu. Then give the new article a Title and some text. Then click on the Publishing tab. We can assign this article to a category, set the Status to Published and select the Start and End dates for this article. Click Save. Then click on the Menu Item for the category the two articles were assigned to.
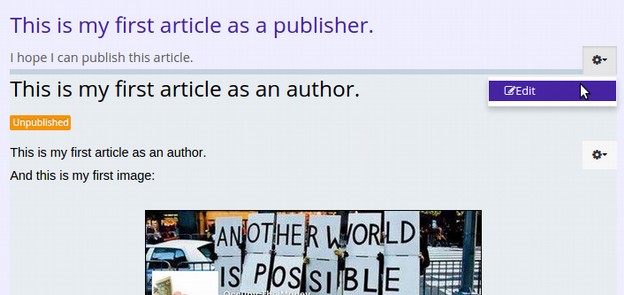
#7 A person assigned to the Publisher group can edit either their own articles or anyone else's articles. Click on the Edit button for the unpublished article. Then change the status of the article from Unpublished to Published. Then click Save. Then click on the Category Menu Item to view the article again. Both articles are now published. Click on the article to edit it again. This time click on Cancel. However, members of the Published group cannot cancel articles. Click on Edit again. This time, unpublish and then save both articles. Next log in as a super user and assign a user to the role of a Manager. Then log into the front end of our website. Then click on Create Article. Then click the Publishing tab. You will see that a member of the Manager group has the same publishing rights as a Publisher. Click on the Category for the two unpublished articles and note that the Manager can publish either one of these articles. But more important, a Manager can log into the back end of our website by first going to the site administrator log in page. Then logging in with their user name and password.
In addition to accessing the Article Manager, Category Manager and Media Manager, the Manager has access to a few components:
If you wanted the Manager to only access the Article Manager, this would require changing their access to each of the above components on the Global Configurations Permissions page as we discuss in a minute. For now, click Content, Article Manager.
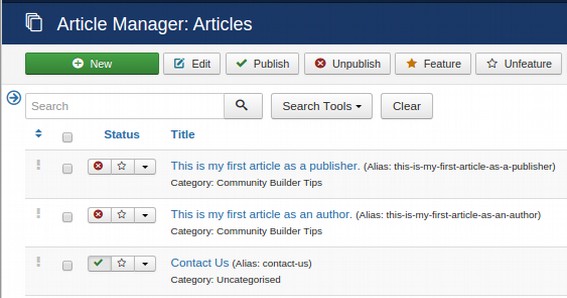
A member of the Manager Group can not just publish articles, but can also delete them. Select the two unpublished articles. Then click Trash. Then click Search Tools, Status, Trashed and select the two articles again. Then click Empty Trash. Next log out as a manager, log in as a Super Administrator and assign a very trusted user to the role of Administrator. Log out, clear the cache, then log back into to the Administrator log in page as this administrator. You will note that you can access every part of our website except Global Configurations and the Template Edit Customization screen.
#8 Viewing and Changing Joomla Group Permissions
Permissions define and control what a group can see and do. Permissions are assigned to a group, not to an individual user. Users get permissions to see and do things by being assigned to a group. There are four places where Permissions can be viewed and changed for each Joomla group. These are default configurations, component options, category settings and article settings.
To better understand how the default permissions have been set for our default Joomla groups, we will briefly look at the default settings in the Global Configurations settings table. The remaining three areas by default are set to “inherit” the settings from Global Configurations unless they are changed at these more precise locations.
Global Configurations Sets Permission for our entire Website
Default Permissions for the entire website can be changed by going to System, Global Configurations. Click on the Permissions tab:
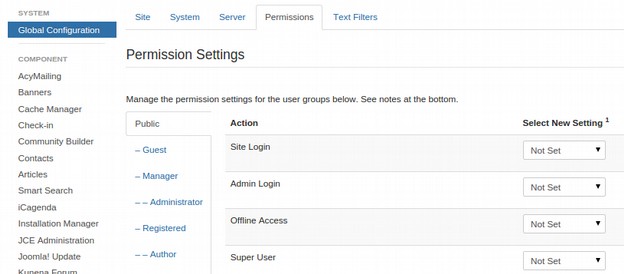
This screen shows that there are no special permissions set for members of the Public group. There is also a side menu for the various Components (or major parts) of the website where permissions can be set for access to each Component. Permissions can also be set for various menu items and for each page of the website that will over-ride the Default Permissions set for the entire website. Click on the Registered tab and you will see that all Registered Members are allowed to do in the Default settings is Log Into the website. Menu items will have to also be set for Registered in order for Registered Users to see these pages.
Click on Authors to see what pages this group is allowed to see.
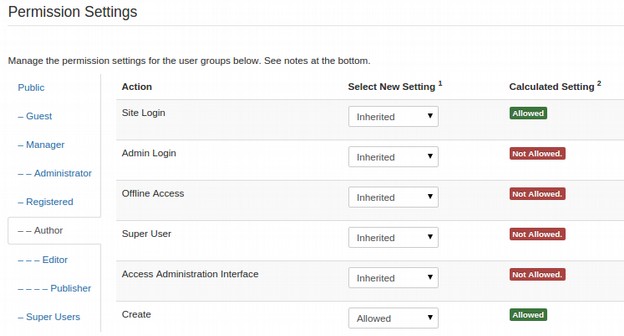
The Select New Settings Column can either be Not Set, Inherit, Allow or Deny. The Calculated Setting column shows you the setting in effect. It is either Not Allowed (the default), Allowed, or Denied.
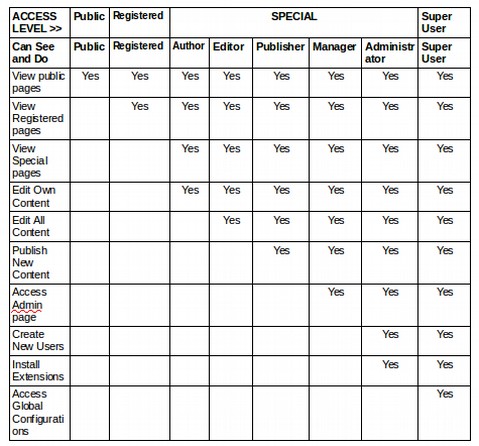
Here is a table of the default settings for all default Joomla groups:
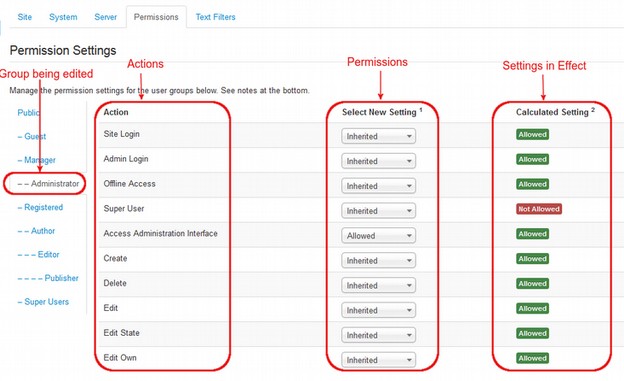
How a Super User can change Global Permissions for the Administrator group:
In Global Configurations, Permissions, select the Administrator group. Then change the settings in the Select New Settings column for any Action (what the group can see or do) from Inherited to Allowed or Deny (Not Allowed). Select one Group at a time by opening the tab for that group. Change the permissions in the Select New Settings drop-down list boxes. Note that the Calculated Setting column is not updated until you press the Save button. To check that the settings are what you want, press the Save button and check the Calculated Settings column.
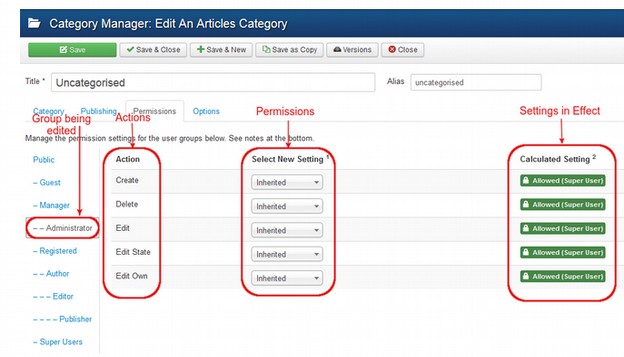
Go to Content, Categories, Uncategorized, Permissions . Then click Administrator. We can create any number of categories in which to place our pages or articles. Then we can assign categories to particular groups. The Permissions System for the Category Manager and Article Manager work much the same way as the Permissions for the Menu items. Here are the Permissions system for an Administrator for the Uncategorized Category.
#9 Why We Should Avoid Setting Permissions to Deny (IMPORTANT!) There is a problem if you change settings to “Deny” in Global Configurations. Once a setting is changed to Deny, it cannot be changed back to Allow at a more precise level such as at the Category or Article Permissions screens. Also, setting Deny for a higher level group such as the Public or Registered Group will force the same settings to apply to all child groups. Since the Super User group is a child of the Public group, setting the public group to Deny could actually lock the Super Users (and everyone else) out of our website! There is a way to get back into your website. But it is very time consuming. So simply avoid setting Permissions to Deny in Global Configurations. The way we avoid setting a custom group that denies permissions is by always choosing a parent group that has permissions LESS THAN we actually need. Then add the permissions we want until we have the group just the way we want it.
What’s Next?
Now that we know a little about Joomla Groups and Permissions, in the next article, we will see how to use Joomla Access Levels to give us even more control over what different groups are able to see and do.