2 Member Groups and Access Levels

Fabrik works closely with Joomla’s default User Groups and Access Levels to determine what each member can see and do on our Community Network website. It is therefore essential to understand how the Joomla User Management System works in order to create your own custom community network. To help us understand this process, this chapter is divided into the following four sections.

2.1 Create a Demo Community Network

2.2 Assign Demo Members to Default User Groups

2.3 Joomla Access Levels

2.4 Finish and Test our Custom User Groups

2.1 Create a Demo Community Network

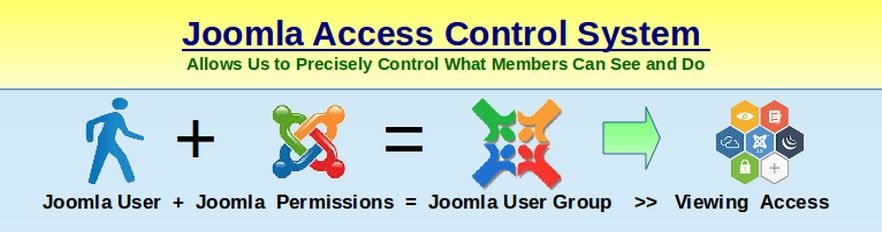
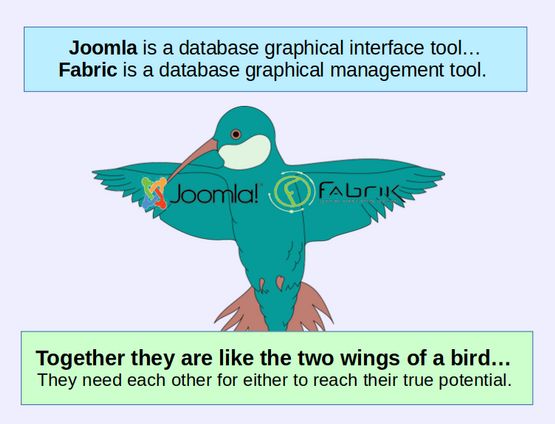
The purpose of creating a custom access control system is to allow different members of our network to access different parts of our website. Fabrik comes with special functions to work directly with Joomla groups and access levels. Together, they make the ideal combination for creation of a community network.

01

To demonstrate how Joomla and Fabrik work together to build and support a community network, in this article, we will create a Demo Community Network.

#1 Define our Demo Community Network Members

A typical community network consists of at least three groups:

02

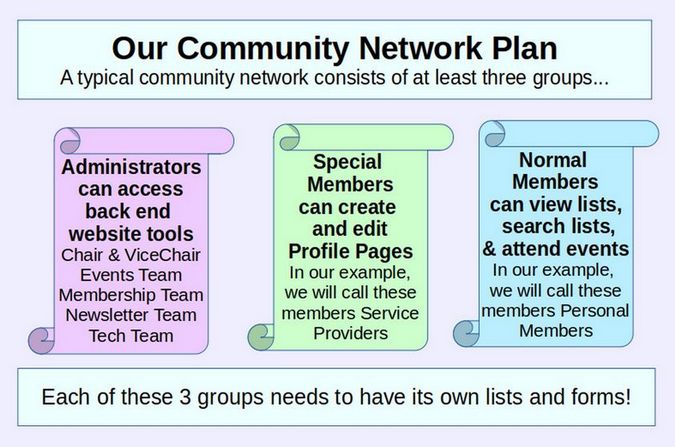
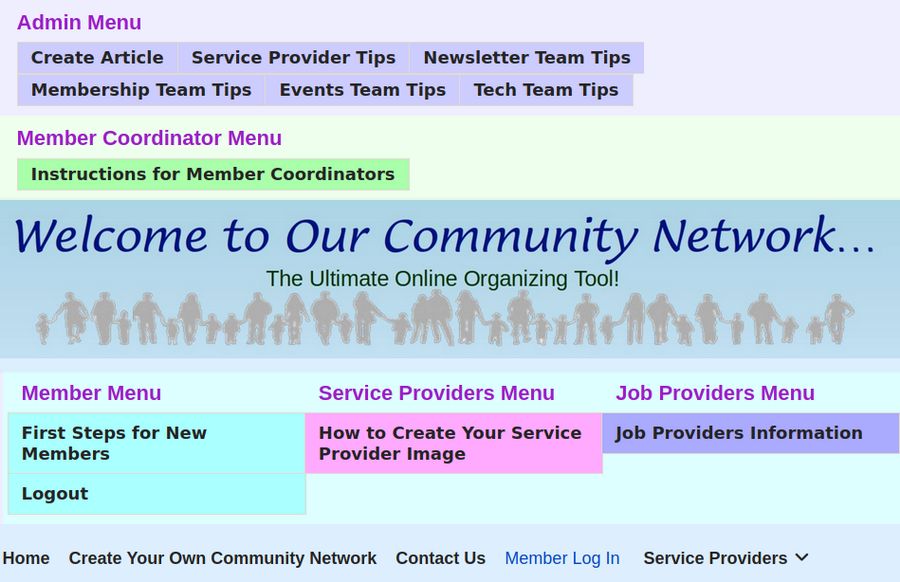
For security reasons, only a small group of people should have access to the back end of the website – and even then, they should only have access to the specific tools in the back end that they need to administer the website. We will cover these administration tools, such as the newsletter component and the Downloads component, in a later chapter. These administrators will typically not be managed by Fabrik forms. Instead, they will be added directly as Joomla administrators using the Joomla Administrator Control Panel User Manager.

The remaining two groups are normal members and special members. Normal members are often given a free membership and merely register in order to get access to the Member Lists, and Search Functions and receive the Members Newsletter and attend Member Events. Normal members can see the Lists and Search Functions and Coming events merely by logging into the website.

Special Members register with the same Member Registration form as Normal Members. However, they are allowed to create custom Member Profile Pages which are then shown on a special searchable list which can be viewed by all members. In our example, we will call these special members Service Providers – because they offer services to other members of the group (who in turn are interested in hiring some of the service providers). However, if this were an educational network, the Special Members might be teachers offering courses to the community and the normal members might be parents and teachers interested in taking those courses.

The important point is that both Special Members and Normal Members join the group by filling out the same Fabrik custom Registration form. Both Special Members access their group functions by logging into the front end of the website. But they see different menu items when they log into the front end of the website. Neither Special Members or Normal Members ever need to log into the back end of the website.

2.2 Assign Demo Members to User Groups

In our last article, we created email addresses for 17 Demo Members. Five Demo Members were registered by the Super User on the back end of our website. In this article, we will assign one of these 7 members to an additional default user group to see how the default Joomla User Management system works. Then in the next article, we will review how to use Joomla Access Levels in combination with Joomla User groups.

We will then create a new custom user group called Services Providers which we will use to give special permissions to our Service Provider members. We can then use our Custom Registration form to create accounts for 6 new members of our Demo Network and assign them to the Services Providers group. We can then see how the Fabrik Search Function works.

#1 Assign the Newsletter Coordinator to the Author User Group
To better understand how the default Joomla User Management system works, log in as a Super User and click on the Users menu item. Then click on the Newsletter Coordinator to open the Edit screen. Then click on the Assigned User Groups tab:

01

We can see that any registered user is automatically placed in the Registered User group. Check the box for Author. Then click Save and Close. This person now belongs to two groups – the Registered group and the Author group.

2.3 Joomla Access Levels

Joomla Access Levels are a way of more precisely defining what groups can see in the front end of our website. Access Levels are also useful for creating custom groups to precisely define what each custom group can see in the front end of our website. Pages and Categories can not only be assigned to different groups with precise permissions – but they can also be assigned to precise Access Levels. But Access Levels can be a bit confusing because folks tend to confuse Access Levels with Groups. As we will see, you can have several groups with the same access level even though each group has different permissions in terms of what each group can do.

Here is a diagram of how the Joomla Access Control System works:

01

A new member begins by filling out the website registration form. This makes them a member of our organization. Members can then be assigned to one or more groups by anyone in the organization with authority to assign them to a group. Each Group that a member is assigned to come with certain permissions which allows the member of that group to take certain actions.

Joomla allows creation of any number of groups - each of which can be assigned their own precise Permissions. In addition, each Joomla group can be assigned to a precise Joomla Access Viewing Level (and new Access viewing levels can be created) which define which pages the group can view.

What Joomla does when a person logs into a website is to first check the group they belong to. Joomla then checks the permissions the group has. Joomla finally checks the access level the group has. Only if all three conditions are met (Group, Permissions and Access Level) is the page or menu item displayed.

This is why Joomla is one of the most secure and customizable web platforms in existence. For comparison, another popular web building platform, Wordpress only has four types of user groups and no way in its core to add user groups, change permissions or assign access levels. There are Wordpress Plugins that do some of this. But because these plugins are outside of the core, they are not secure and they are not reliable. To see the default Joomla Access Levels, click on Users, Access Levels:

02

The default access levels are Public, Guest, Registered, Special and Super User. Click on the Public Access Level and you will see it is only assigned to the Public Group. Guest is connected with the Guest Group. But Registered is connected with the Manager Group, the Registered Group and the Super User Group.

2.4 Finish and Test our Custom Member Groups

In a previous article, we use the Joomla User Management system to create several new groups and connected them to Access Levels. In this article, we will we will review steps 5, 6, 7, 8 and 9 of the Custom Group creation process and then testing the back end of our new Demo network. But before we dive into the details, we will take a step back and look at the hidden structure involved in building an online community network. As we outlined earlier, an online community network includes several groups. These groups include:

Public visitors to our community network.

Registered Members of our community network who have access to view or see areas of the website that are not accessible to the general public.

Special Registered Members who have the ability to create content on the front end of our website. In our example, we call these Service Providers and Job Providers. But if this were a school organization, they might be called Teachers and the Registered Members might be called Parents and or Students.

Front End Administrators who have the ability to add new members without the need to log into the back end of the website. In our case, we call this group Member Coordinators.

Back End Administrators who can log into the back end of the website in order to post events, create group registration forms, create group events, moderate forums, send newsletter, create events and publish articles written by them or submitted by other members of the community.

Each of these five groups needs their own place to post and share knowledge. Each of these posts consists of an article which is made visible by creating a menu item linked to the article. While all of these menu items could be placed on a single Main Menu, it is better to create separate menus for each of these five groups.

In our example, this means having a Main Menu for the Public, a Members Menu for Registered Users, a Service Provider Menu for Service Providers, a Job Provider Menu for Job Providers, a Member Coordinator Menu for Front End Administrators and an Administrators Menu for Back End Administrators. Each menu will only be visible to members who log into the front end of the website as a member of the associated group. To make these menus more visible, we will place them near the top of the website, just above or below the header image. Here is a Table showing the layout of these six menus.

Use the Helix Layout Tool to Create Rows for these Menus
One of the biggest benefits of the Helix template is that we can easily create new rows for our menus. Here is what the layout tool looks like for Our Community Network:

01

Here is what these 6 menus will look like to an administrator who logs into the front end of our website:

02

Thanks to Joomla Access Levels, Member Coordinators (after they are logged in to the front end of the website) would see everything except the top row Administrator Menu. General Members would only see the Members Menu and the Main Menu. Service Providers would see the Main Menu, the Members Menu and the Service Provider Menu. The public only sees the main menu.

Now that we understand the eventual goal, let's dive into the details on how to create these six menus and their associated menu items.