
In the last article, we finished creating the Member Registration, Job Provider and Service Provider lists and forms we need to run our new network. All of these forms allow us to add new data just by clicking on the Add button in the back end of our website. In this article, we will first look at the Service Provider Form and List in the back end and then create menu items to look at the same form and list in the front end. We will then use our Member Registration Form to add our Demo Members and have our Demo Service providers fill out the Service Provider form to test how well our new network works.
View our Service Provider Form and List in the Back End
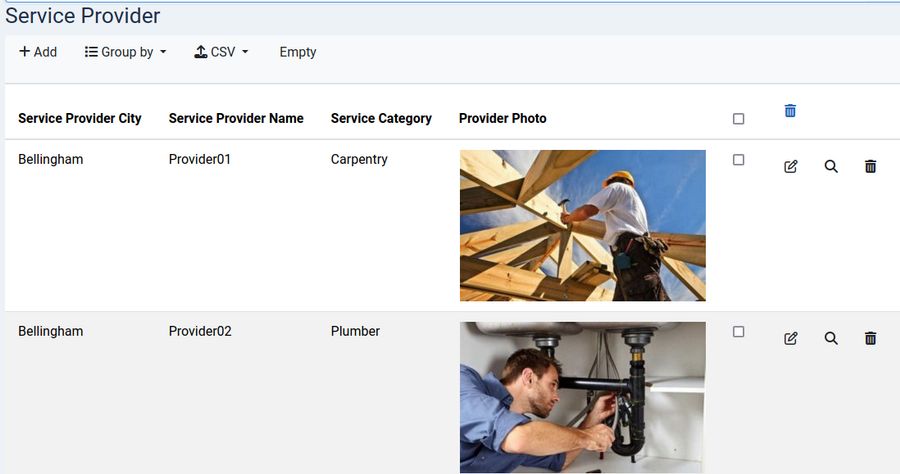
Go to Fabrik Forms, Service Provider and click View Data.
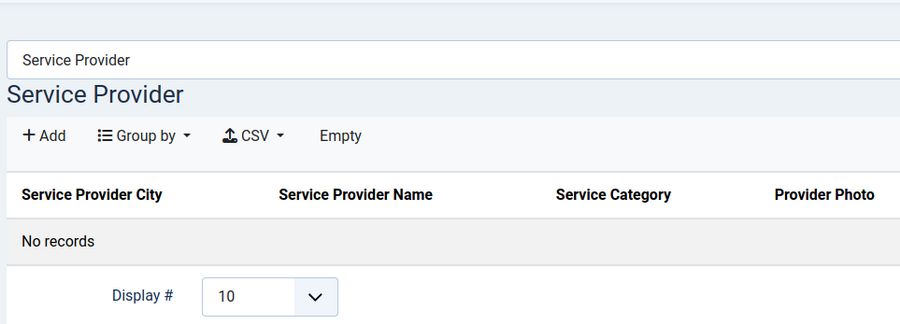
We have set the elements for this form so that the only elements shown on the Back End List are Service Provider City, Service Provider Name, Service Provider Category and Provider Photo. Note that we reordered the elements to put the Service Provider City first. We could add new service providers here in the back end if we wanted just by clicking on Add. Note that there is no spam filter on the Provider Info form. The only form we will use a spam filter on is the Member Registration form. Click the back arrow to exit this screen. We will next create menu items to add our Demo Members in the front end.
Create 9 More Front End Menu Items
We need several menu items for our Network to work. We have previously created three Fabrik Forms. These are a Member Registration form, Job Provider form and a Service Provider form.
Each form can be linked to three different front end menu items:
First, we can display the form itself by creating a Fabrik Form Menu Item. Second, we can display a Form Edit page for each member to edit their form using the same Fabrik Form menu item type – but also adding a Row ID and Key Name to the Fabrik Form Options tab. We describe this below. Third, we can display a Fabrik List Table page using the Fabrik List menu item.
Here is a table showing each of these 9 menu items and the menu we will put them on.
|
Form |
Menu Item |
Assigned to Menu |
|
Member Registration |
Member Registration Form |
Main Menu and Member Coordinator Menu |
|
Member Registration |
Member Registration Edit |
Member Menu |
|
Member Registration |
Member List Table |
Member Coordinator Menu |
|
Service Provider |
Service Provider Form |
Service Provider Menu |
|
Service Provider |
Service Provider Edit |
Service Provider Menu |
|
Service Provider |
Service Provider List |
Main Menu |
|
Job Provider |
Job Provider Form |
Job Provider Menu |
|
Job Provider |
Job Provider Edit |
Job Provider Menu |
|
Job Provider |
Job Provider List |
Member Menu |
In article 3.3, we create a Member Signup menu item which is on our Main Menu and viewable by the public. Below we will also add the Member Registration form to our Member Coordinator Menu.
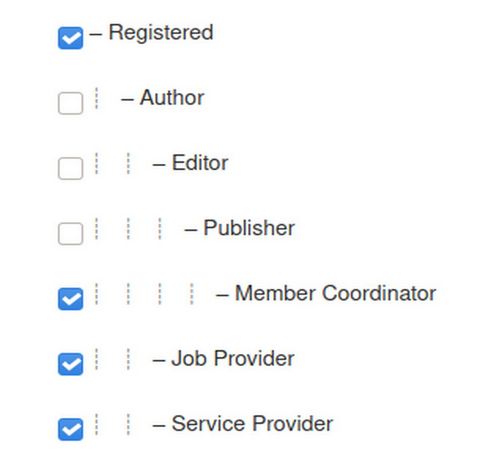
The next 7 menu items should have the access set to Registered. These include a Member Registration Edit page assigned to the Member Menu, a Service Provider Sign Up Menu item assigned to our Service Provider Menu, a Service Provider Edit menu item assigned to our Service Provider menu and a menu item for the Service Provider List which can be assigned to the Main Menu.
A Job Provider Sign Up Menu item is assigned to our Job Provider Menu, a Job Provider Edit menu item is assigned to our Job Provider menu and a menu item for the Job Provider List is assigned to the Member Menu.
Finally, we need to add our Registered Members List to the Member Coordinator menu so that our Member Coordinators will be able to promote normal registered members to Service Provider Members without having to log into the back end of our website. We will also add a second copy of the Member Registration form to the Member Coordinator Menu. It will show a Group Assignment field not shown on the Member form on the main menu. Member Coordinators can use this hidden Group Assignment field to assign any member to any of the three Service Provider categories.
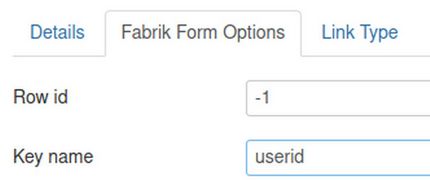
#1 Create a Member Registration Edit menu item
We need a way for Members to edit their Member Info Form entries. For example, they may want to change their email or password. We will therefore create a Member Info Edit menu item. This will be a challenge because we only want each member to be able to edit their own Member form. We do not want them to be able to edit a different Member Form. To achieve this, go to Menus, Member Menu and click New. Then choose Fabrik Form. Then select the Member Registration form. For Title, type Edit your Member Info. For access, choose Registered. Then click on the Fabrik Form Options tab. Type -1 in the Row id box and userid in the Key Name box.
Then Save & Close.
#2 Create a Service Provider List menu Item in the Main Menu
We will now create a Service Provider List menu Item in the Main Menu so that all visitors to our website can see our Service Provider List. Go to Menus, Main Menu and click New. Then click Select and select Fabrik List. Then for Fabrik list, select the Service Provider list. For Title, type, Service Provider List. For Access, leave it as Public. Then click Save and Close.
#3 Create a Service Provider Sign Up menu item
Go to Menus, Service Provider Menu and click New. Then click Select and select Fabrik Form. Then for Fabrik form, select the Service Provider form. For Title, type, Service Provider Signup. For Access, select Registered. Then click Save and Close.
#4 Create an Edit your Service Provider Info menu item
We need a way for Service Providers to edit their Provider Info Form entries. For example, they may want to change their contact information or replace their Provider Photo. We will therefore create a Provider Info Edit menu item. This will be a challenge because we only want each provider to be able to edit their own Provider Info form. To achieve this, go to Menus, Service Provider Menu and click New. Then choose Fabrik Form. Then select the Service Provider form. For Title, type Edit your Service Provider Info. For access, choose Service Provider. Then click on the Fabrik Form Options tab. Type -1 in the Row id box and userid in the Key Name box. Then Save & Close.
#5 Create a Job Provider List menu Item in the Member Menu
In article 2.2, we created a Members Menu that can only be seen by logged in Members. We will now create a Job Provider List menu Item in the Member Menu so that all registered Members can see our Job Provider List. Go to Menus, Members Menu and click New. Then click Select and select Fabrik List. Then for Fabrik form, select the Job Provider list. For Title, type, Job Provider List. For Access, select Registered. Then click Save and Close.
#6 Create a Job Provider Sign Up menu item
Go to Menus, Job Provider Menu and click New. Then click Select and select Fabrik Form. Then for Fabrik form, select the Job Provider form. For Title, type, Job Provider Signup. For Access, select Registered. Then click Save and Close.
#7 Create an Edit your Job Provider Info menu item
We need a way for Job Providers to edit their Job Provider Form entries. For example, they may want to change their contact information. We will therefore create a Job Provider Edit menu item. This will be a challenge because we only want each job provider to be able to edit their own Job Provider form. To achieve this, go to Menus, Job Provider Menu and click New. Then choose Fabrik Form. Then select the Job Provider form. For Title, type Edit your Job Provider Info. For access, choose Job Provider. Then click on the Fabrik Form Options tab. Type -1 in the Row id box and userid in the Key Name box. Then Save & Close.
#8 Create a Registered Members List in our Member Coordinators Menu
We need to add our Registered Members List to the Member Coordinator menu so that our Member Coordinators will be able to edit and thus promote normal registered members to Service Provider Members without having to log into the back end of our website. Go to the Member Coordinator Menu and click New. Click Select Fabrik Lists. Then select the Member Registration List. For Menu Title, type Member List. For Access, select Member Coordinator. Click Save & Close.
#9 Create a Member Registration Form in our Member Coordinator Menu
Click New. Click Select Fabrik Form. Select the Member Registration form. For Title, type Register a New Member. For Access, select Member Coordinator. Then click Save and Close.
View the New Menu Items
Log into the front of your website as a Super User to view the new Menu Items:
In the Member Menu, move Logout to the bottom.
Joomla Front End versus Back End Groups
Joomla has 4 groups that can access only the front end of the website – and 3 groups that can access both the front and back end of the website. Here are the 4 front end only groups:
In addition to the 4 Front End Only groups, Joomla has three groups that can access either the front or back end. These are called Managers, Administrators and Super Users.
Registered Members can login to the site front end Registerd Content area. But they are not allowed to edit any content.
Authors can create articles but these articles are not published automatically. Authors are able to edit their own work – but not the work of other authors.
Editors can create articles and can edit articles created by them or created by authors. But editors are not allowed to publish articles.
Publishers can create, edit and publish articles.
Protecting our Network from Hackers
We have spent a huge amount of time to set up a secure website on a secure server. But all this time will have been wasted if hackers can gain access to the back end of our website.
The easiest way for hackers to gain access to the back end is if a member of our Network logs into the back end on a hacked Windows computer. Because Windows computers can be easily hacked, it is essential to limit access to the back end of the website to only those who have a Linux computer. How we limit access to the back end of the website (also called the Joomla Control Panel) is by carefully defining our Joomla User groups. This means only allowing our Members, Service Providers, Job Providers and Member Coordinators – folks who may not have a Linux computer – to only access forms on the front end of our website.
Key Role of the Front End Member Coordinator Group
We have previously created custom front end only groups called Service Providers and Job Providers. They both have the same permissions as the Authors group. We also created a Member Coordinator group that has the same permissions as the Joomla Editor group. Our Member Coordinator can access to our Fabrik Member List and edit the groups of new and existing members.
Joomla Front End Access Levels
In addition to the four Front End only groups, Joomla comes with 5 basic Front End Access Levels
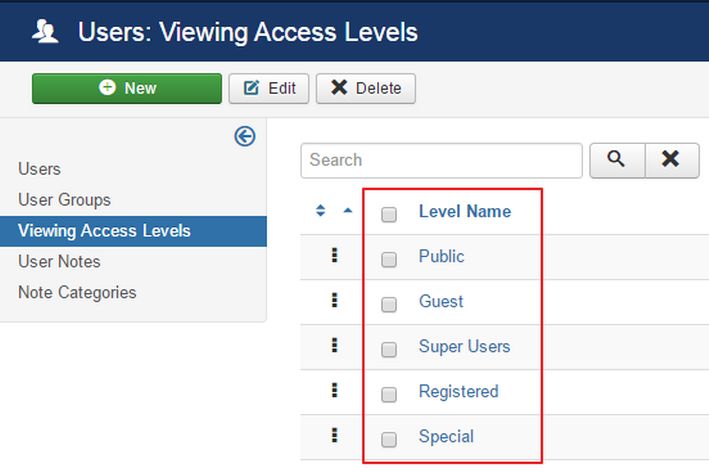
Public Access means content that can be viewed by any visitor, regardless of whether or not they are logged into your site.
Guest Access means content that will be hidden from site visitors if they are logged into the site. For example, you can use this to hide the Member Sign Upand Member Log In Menu Items which are not needed by those who are already logged in.
Registered Access means content that can be viewed by Registered Members after they login to the Frontend.
Special Access content can only be viewed by Authors, Editors, Publishers (3 front end groups) and Managers, Administrators and Super Users (3 front and back end groups). Sadly, the Special Access Level lumps together too many groups. For example, if we assign the Special Access Level to a Menu or Menu item, it can be viewed by both Authors and Publishers. This means that Service Providers, Job Providers and Member Coordinators will all see the same Menus. What we want is for each group to see a different menu. The solution to this problem is to create different Access Levels for Service Providers, Job Providers and Member Coordinators. Then assign the menus to those custom access levels.
We also created an Special Admin access level which can only be seen by the three back end groups. The Administrator menu is set for Special Admin Access which means that it can not be viewed by Service Providers, Job Providers or Member Coordinators.
Front End Access Control Tests
We are now ready to test our new Network. To test the front end member access system, we need to add our remaining Demo Members using our Member Registration form on the front end of our website. We have previously created a Table of 17 Demo members, User Names, email addresses and passwords. Below is this table:
Use Front End Registration Form to Sign Up 6 Demo Members
Now that we have our Registration and Provider forms, we can test them in the front end. Click Member Sign Up to open our Registration form. Then use the above table to register our 6 Demo Members.
Each new Member will automatically receive an Account Details email letting them know that they can now log into our website with their username and password:

The primary Member Coordinator will get 6 Email Notices from the Fabrik Email Form plugin that new members have registered.
Then go to the back end User table. Now all 6 are in the Joomla User Table. And all 6 are members of the Joomla Registered User group. And all 6 appear in the Fabrik Registration Form View Data Table. However, they are not shown as being in the Fabrik Registered group. For each, click Edit and Save. Then click the back arrow twice to fix this issue.
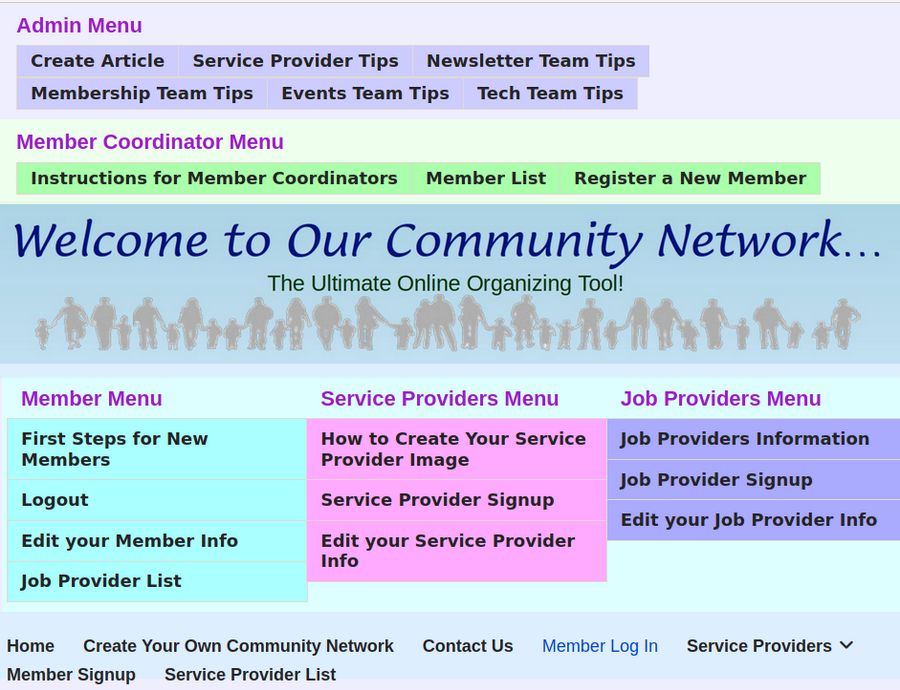
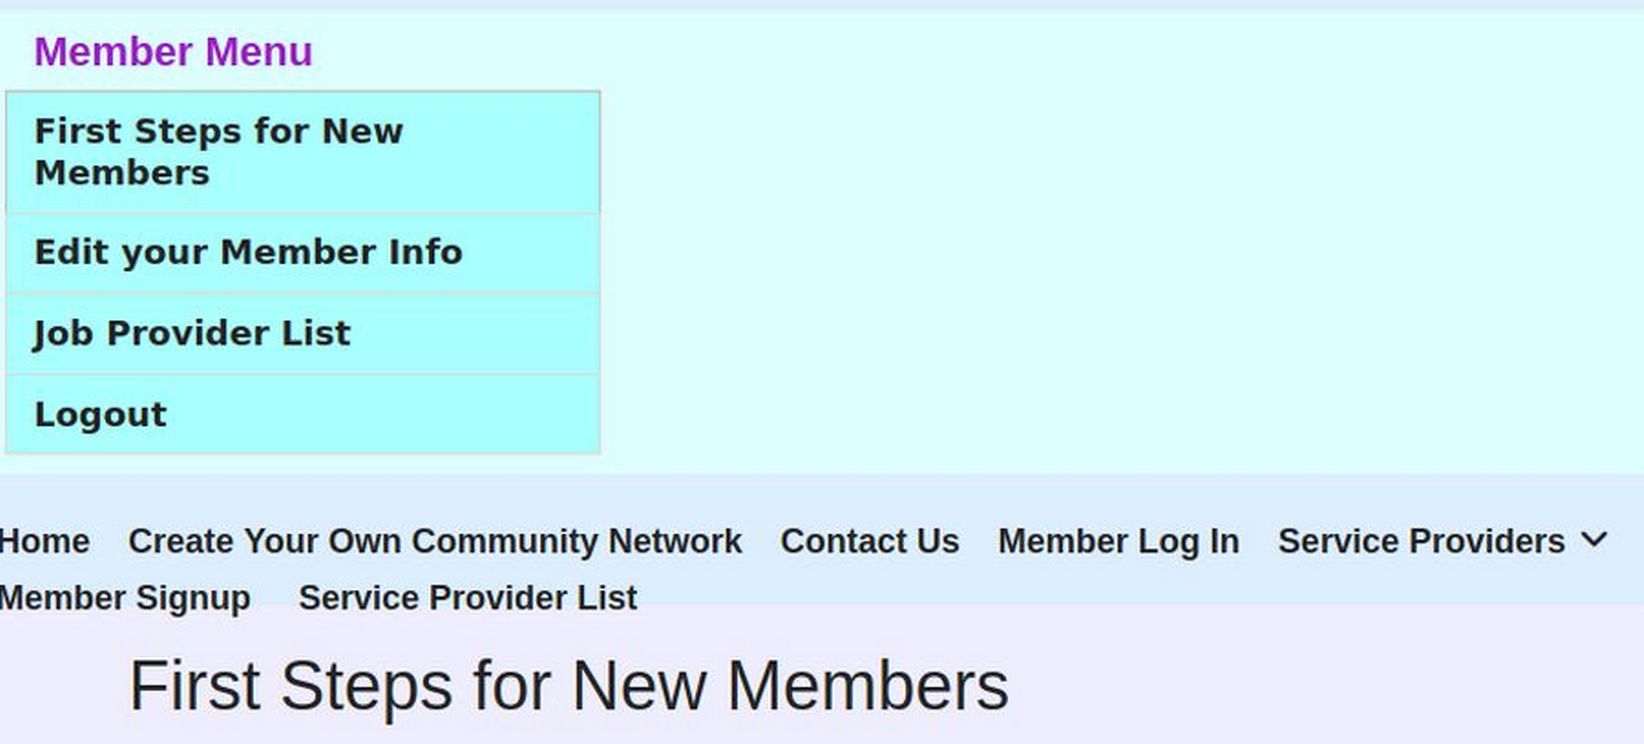
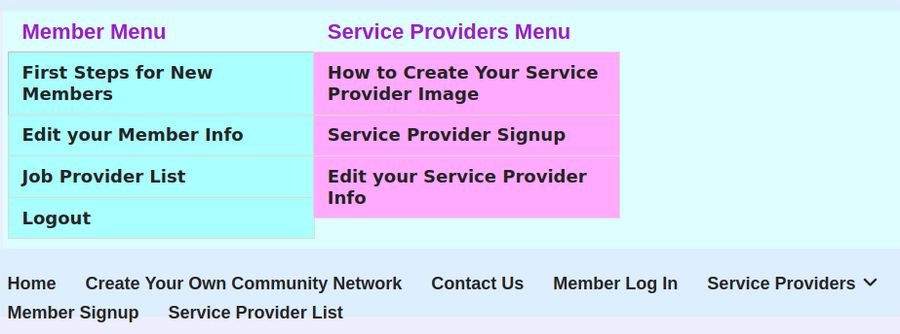
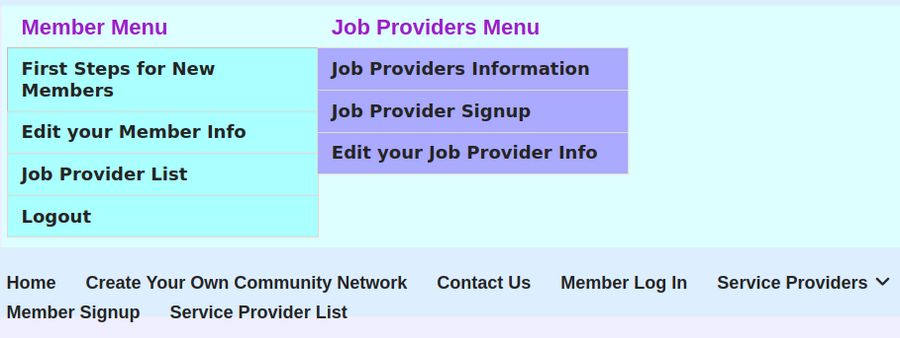
Then go to the Front End of the website and log in as the first Member01. Here is the Members Page and Menu this new member should see after they are logged in:

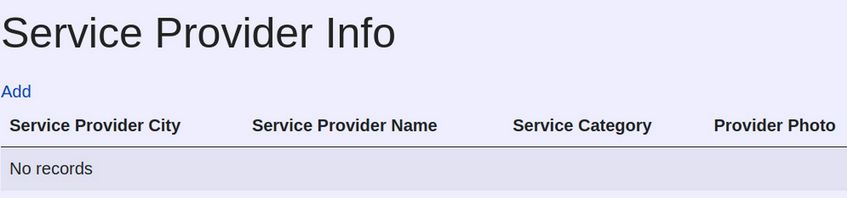
Note that on the Main Menu, the Member Sign Up and Member Log In menu items are now hidden. This is because they were both assigned to the Guest access level. Also a new Members Menu has appeared above the Main Menu. It includes menu items to view the Service Provider List and the Job Provider List. Click on the Service Provider List to see it is empty:
In the Members Menu, Click on Edit your Member Info. It should be prefilled with the information for Member 01.
Change Login Redirect to the First Steps for New Members Page
Go to Content, Site Modules, Login Form, Login Redirection Page and change it to First Steps for New Members. Then stay logged into the back end as a super user and go to the Front End of the website and log in as the first Member01. Verify that the new member log in is taken to the First Steps for New Members Page:
Also verify that the new member can view the Member Menu and can edit their Member Info.
Change Access to the User Group element to Member Coordinator.
Go to Fabrik Elements and Filter for the Member Registration form. Then click on the User Group element to edit it. Click the Access tab and change Form (add), Form (edit) and List View from Super Users to Member Coordinator.
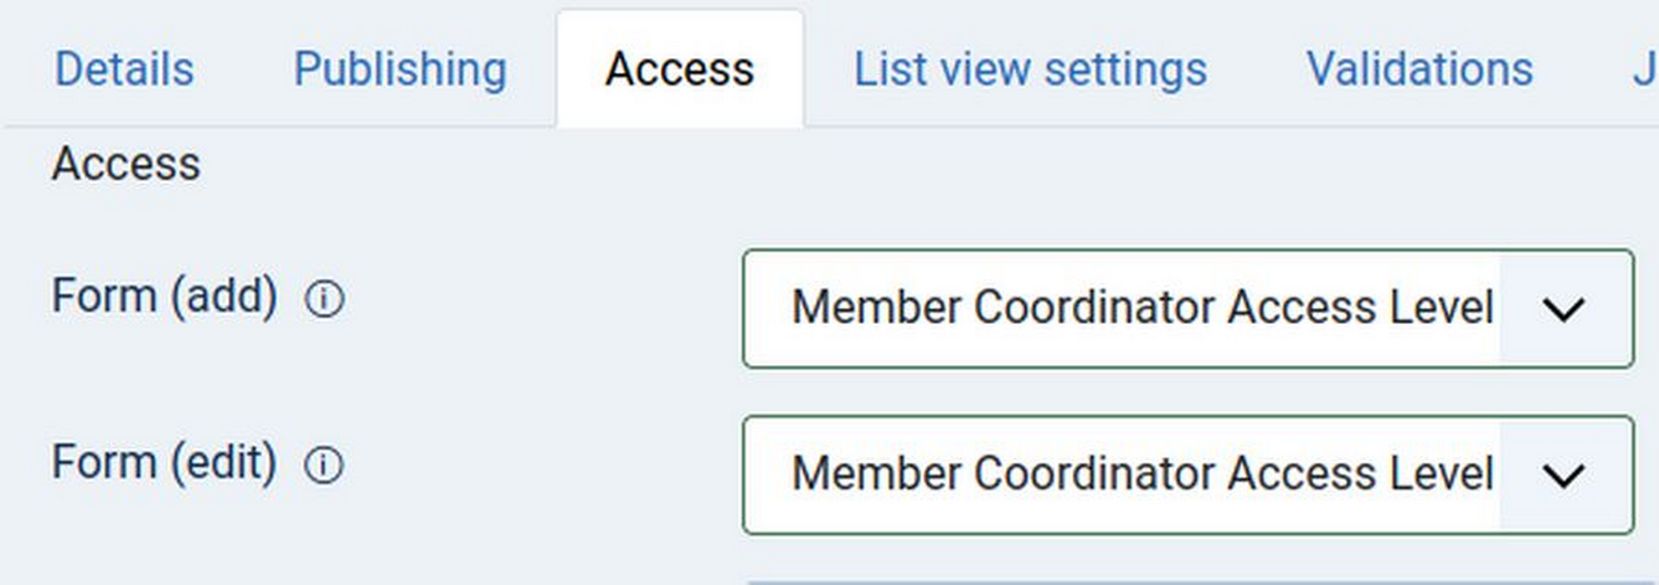
Then click Save and Close.
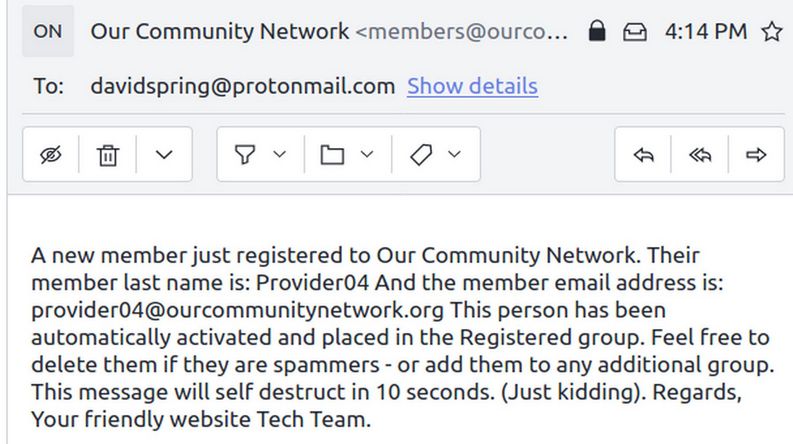
How to Become a Member Coordinator
Becoming a Member Coordinator will give you access to the Member Coordinator Menu at the top of the front end of our website. To become a Member Coordinator, get a secure ProtonMail account. Use your Protonmail email address to sign up for a Personal Member account – entering your username and password.

Then send an email from your Proton Mail account with your First Name and Last Name to a member of our Tech Team or to an existing Member Coordinator.
The Tech Team Member will use a Linux computer to log into the back end of the website and go to Fabrik Forms, View Data and edit your Membership form to add you to the Member Coordinator group, the Job Provider Group and the Service Provider group. Alternately, a Member Coordinator can log into the front end of our website with any computer and add you to the same three groups.
They will then send you a confirmation email. Log into the Member area of your website front end and you should now see the Member Coordinator Menu in addition to the Members Menu.
The Member Coordinator Menu has two Menu Items – the Member List and Instructions for Member Coordinators. Click on the Member List. Then scroll down to Member 01:

The Member Coordinator can edit the groups that any member belongs to. Click Edit. Click on the Job Provider and or Service Provider boxes. Then scroll to the bottom of the form and click Save. You can now email Member01 and let them know that they can log into their personal member account.
Now that we have at least one and hopefully several Member Coordinators, we are ready to test our Member Registration System.
How a Member can become a Service Provider
Let’s assume Member01 also wants to be a Service Provider. They first need to Register as a Member. In Member Options, click on Personal Member and Job Provider. They then need to send us an email so we can add them to the Service Provider group which will then allow them to see the Service Provider menu.
The Member Coordinator will then assign the member to as both Registered and a member of the Service Provider group. The Member Coordinator will then email the member letting them know that their Service Provider Membership has been approved.
For now, we will assume that each member has completed the Personal Member form at one of our meetings and been approved as a Personal Member and a Service Provider.
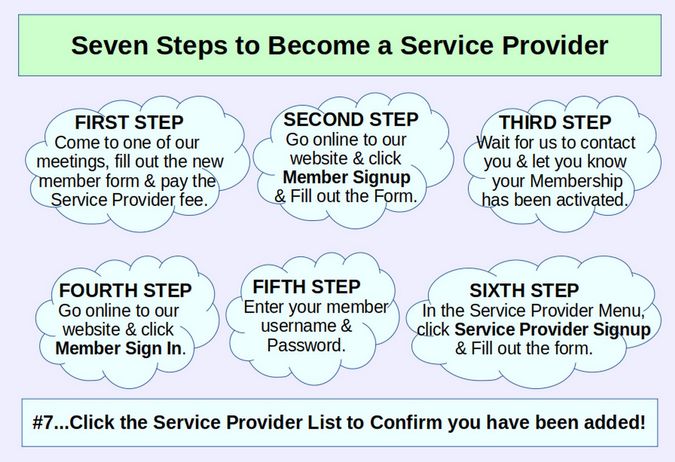
Here are the 7 steps to becoming a Service Provider:
Click on the Member List to Assign Service Providers
Assign the Members Team Leader, members1, to be a Member Coordinator, a Service Provider and a Job Provider. Then log into the front end as members1. Verify that you can see the Member Coordinator Menu. Click on the Member List. Then scroll down to Member01. Then click the Edit icon to the right of Member01 to assign them to the Service Provider group. Note that the Member Coordinator can not assign a Member to the Super User group because they do not belong to this group. Scroll to the end of the form and click Save.
Another way to add a new role to a registered Member is to log into the Joomla admin panel and go to Fabrik, Forms, Member Registration, View Data. Then click on the Edit button and click the new role.
Here is a table of Member to Service Provider information:
|
Member Name |
Provider Name |
City |
Category |
Provider Website |
|
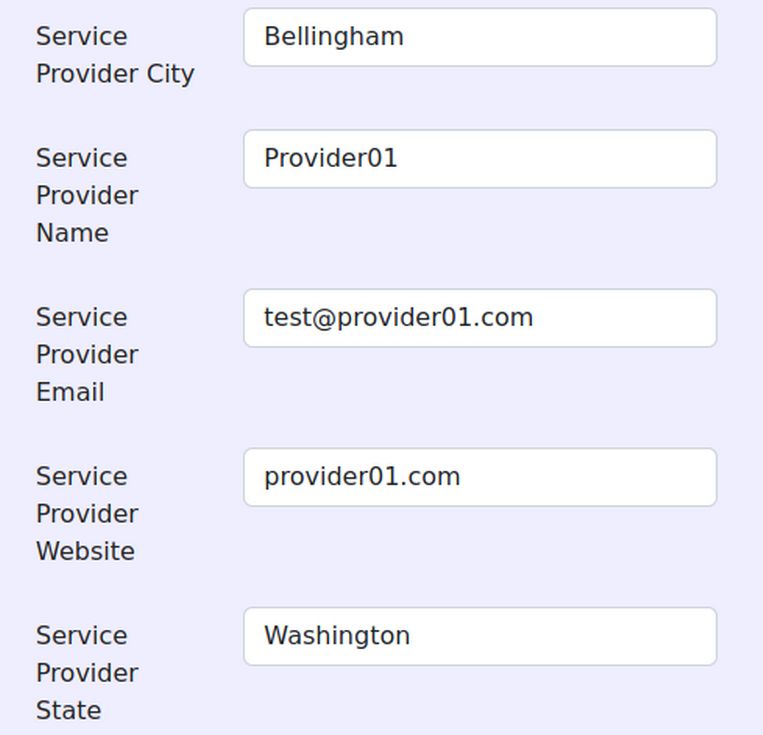
Member01 |
Provider01 |
Bellingham |
Carpenter |
provider01.com |
|
Member02 |
Provider02 |
Bellingham |
Plumber |
provider02.com |
|
Member03 |
Provider03 |
Bellingham |
Teacher |
provider03.com |
|
Member04 |
Provider04 |
Ferndale |
Carpenter |
provider04.com |
|
Member05 |
Provider05 |
Ferndale |
Plumber |
provider05.com |
|
Member06 |
Provider06 |
Ferndale |
Teacher |
provider06.com |
Here is the result:
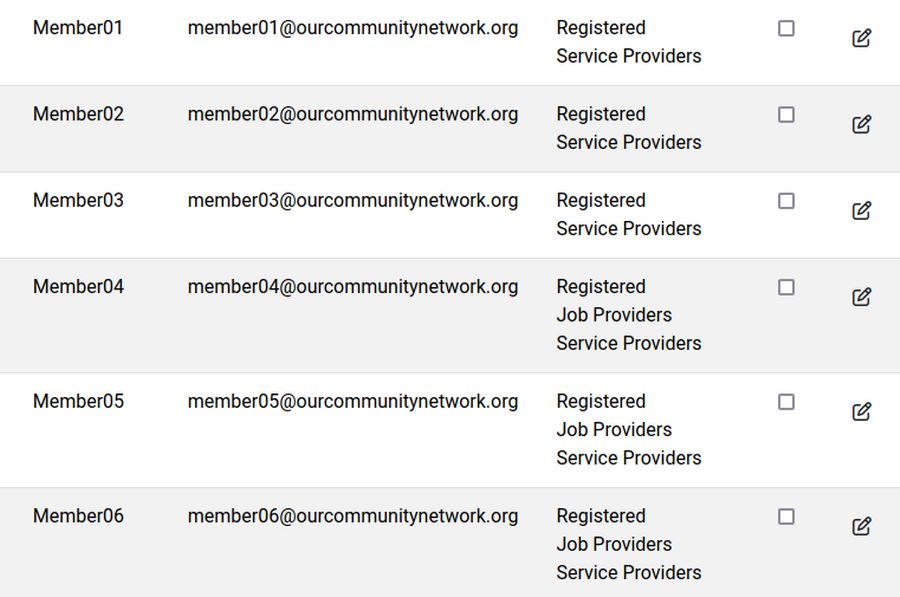
Note the last three have also been assigned as Job Providers.
Special Note: While you can assign a new group to a Member either as a Member Coordinator in the front end or as an Administrator in the Fabrik Form View Data Edit screen in the back end, you might not be able to remove a group from a Member at either of these screens. Instead, the best and sometimes ONLY WAY to remove a group from a Member is to log in as an Admin and click on Users, Manage. Then click on the Member to edit them. Then click the Assigned User Group tab where you can then remove a group from a Member. You can then go to the Fabrik Form View Data screen where you can update the groups by clicking on the Member Edit screen and then click Save.
Once the Member Coordinator has assigned a Member to the Service Provider group, they can then reply to the Member email and let them know they have been added to the Service Providers list and should now be able to see the Service Providers menu and form when they log in.
Log In as Member01 to see this additional menu:
Click on How to Create your Service Provider Image and follow the steps to create an image 300px wide and under 100 KB in file size. Click Service Provider Signup to fill out the Service Provider form.
Here is the top of the form:
Here is the middle of the form:
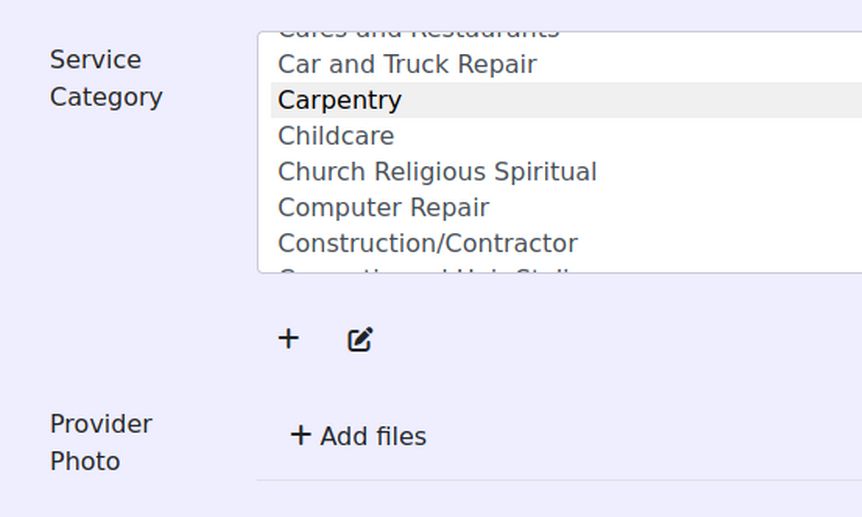
You can select more than one category by holding down the Control key. Click Add files to add your Provider Photo. Close the Preview screen and click Allow to allow the website to use this image. Here is the bottom of the form:

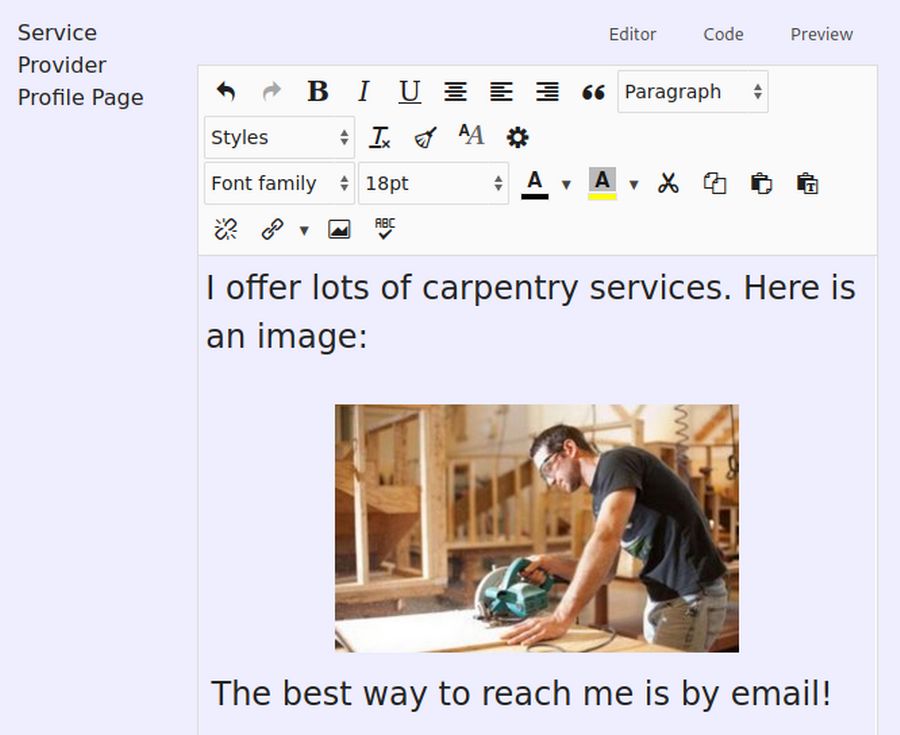
Here you can add text, images, videos and links.
Note that you will need to save the form before you can add images:
Note: If members have more than one category of service, they can put additional categories in the Provider Additional Info box. However, the additional categories will not be searchable.
After completing the form for the first Demo Service provider, click on the Service Provider list to confirm you have been added to the list.
Click on Edit your Service Provider Info. This opens up your filled in Provider Info form where you can change whatever you want. Then click Save.
Click on Service Provider Information to see Service Provider articles.
Click on Service Provider List to see all of the Service Providers.
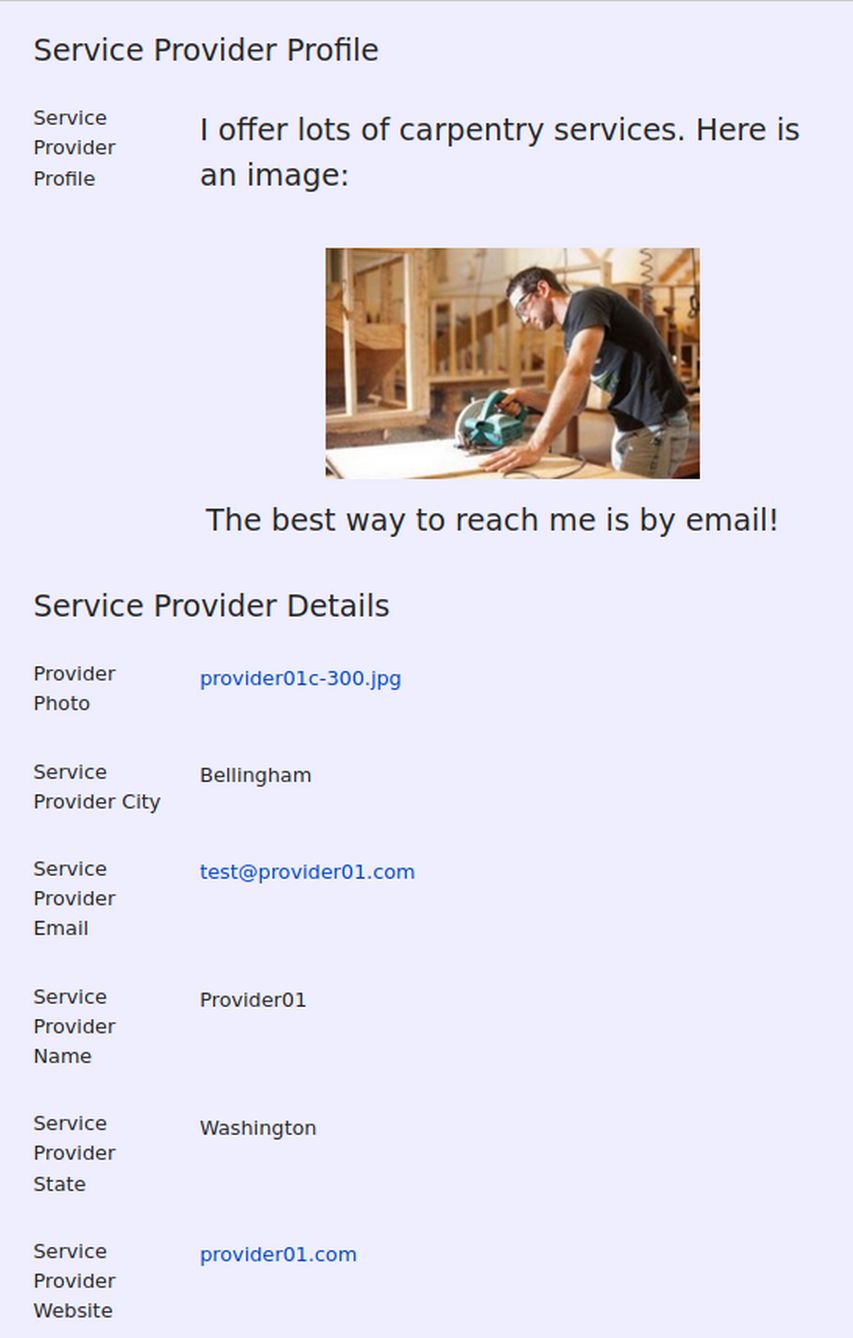
Click on View to view your Service Provider Profile Page.
To log out, click Member Log Out. Repeat this process to add all 6 Service Providers and then add 3 Job Providers.
View the Registration form data in the back end
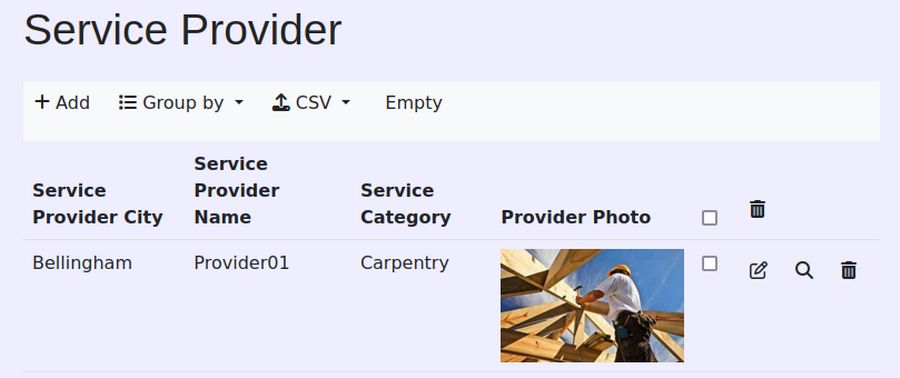
After adding all 6 Demo Service Providers, go to Components, Fabrik and click View Data. Then click Group by Provider City.
Here is where you can also edit the data or delete the Provider.
Go to your site Home Page and click on the Service Provider Table. Then click on the View button for Provider 01 to see the Profile Page.
Note that we have written a separate article on how to create a Provider image. In this article, we created the 6 service provider images we need for our 6 Demo Service providers to complete their Provider Info forms. Each image should be 300px wide by 185px high and the file size should be under 100KB.
Note: If members have more than one category of service, they can hold down the Control Key and select up to three categories – all of which will be searchable.
Here are some other tips for creating your own community network.
Change Slideshows and Other Modules to Guest Access
One problem of Fabrik is that many of the Fabrik pages will display modules like slideshows even if you have set the slideshow to only appear on the website Home page.
You can solve this problem, by editing the slideshow module and changing the access to Guest. Guest access means that the module will be hidden from any logged in user.
How to Delete a Fabrik Element
There are many reasons you may want to delete an element. You may decide your form is too long and you want to shorten it. Or you may want to replace a field element with a checkbox element. It is wise to delete an element carefully as doing it wrong may create problems for your database that require completely rebuilding your form from scratch. Here are some steps for deleting an element:
First, go to Components, Fabrik, Elements. Then find the element you want to delete and check the boxes so that the element is not shown in the list and is not published. Then select the element and click on Trash in the Top Menu. Then in the side menu, change Status to Trashed. Then select the element and click Empty Trash. This will bring up the Delete Associated Database Column screen:

Here is the official explanation of what this screen will do: All these elements (checked or unchecked) will be deleted on SAVE. Additionally you can select elements where you want to drop (delete) the associated database column. Attention! The columns may be used by others (elements, custom code, plugins, Joomla, 3rd party). Check only if you want to delete the DB column.
In plain English, the above is warning that this column may be used by other applications. But in our case, the column personal-interests is not being used by any other forms or applications. Check the box. Then click Save. It will reply that the element was successfully deleted. Then change Status from Trashed back to Select Status.
How to Delete and Rebuild your Fabrik Component
When you are first learning Fabrik, it is possible to mess up your Fabrik Custom Registration form so badly that no matter what you do, it becomes no longer possible to register Demo Members.
When the form is submitted, it might display an error page or refuse to load. Or it might say that it has a validation error. These problems may continue even after you have deleted nearly all of the elements and nearly all of the groups.
If this happens, the best option might be to simply start over. But you need to be careful when uninstalling Fabrik. First, go to Components, Fabrik, Groups and copy all of your custom groups with their Intros and Outros. Then go to Fabrik, Elements and copy all of the Elements and their settings.
Then go to Extensions, Manage, Manage and enter the term Fabrik in the Search Box. You will see a list of almost 40 components, modules and plugins:
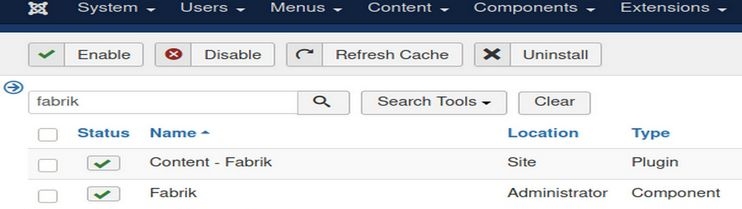
Before uninstalling, select and disable the Fabrik System Plugin. It is at the very bottom of the list. Then go back to the top of the list and click the Select All button. Then click Uninstall. Then go to Extensions, Manage, Install to re-install Fabrik and any needed plugins. Then go to Components, Fabrik where you should see a clean blank Fabrik installation.
What’s Next?
Now that we have tested our custom Registration form, in the next article we will learn how to use our Searchable Lists.