3 Create Custom Network Forms

Our Member Management process begins with the creation of a custom Fabrik Member Registration form to replace the default Joomla Registration form. While other forms can be added over time, the Member Registration form is the key to building your community network. Each Fabrik Form comes with at least one Fabrik Group. Fabrik groups help us break down a complex form into smaller sections each with its own collection of elements. This chapter is divided into the following four articles:

3.1 Member Network Overview

3.2 Design Your Member Registration Form

3.3 Finish Your Member Registration Form

3.4 Create Your Job and Service Provider Forms

3.1 Member Network Overview

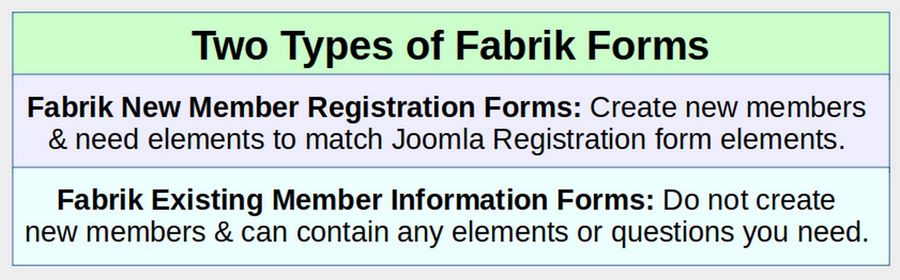
A custom registration form is the most important tool of any community network. While the Joomla Content Management System is a strong foundation for any website, the default Joomla Registration form suffers from two major problems. First, it is not customizable. It can not be adapted to the needs of our community network. Second, the default Joomla Registration form does not display a searchable list. Thus, there is no way for members to interact with other members. We will use the Fabrik Form Builder to create custom forms and searchable lists to help community members interact with each other. We will build three different forms in order to give new members three different ways to participate in our community network.

Three Ways to Participate in Our Community Network
One of our goals of our community network is to show how to help a local community rebuild their economy from the ground up. We do this by providing three different ways for new members to participate.

The first way is by signing up to be a New Member
All Members have access to coming events, newsletter articles and the ability to write their own articles and host their own events. to share with other members of the group.

The second way is by signing up to be a Service Provider
Historically, service providers were called Employees. However, we are using this term to describe anyone who wants to provide a service or product to another person or be hired by another person. Examples of Service Providers include plumbers, teachers, financial planners, landscapers, wellness coaches, singers, etc.

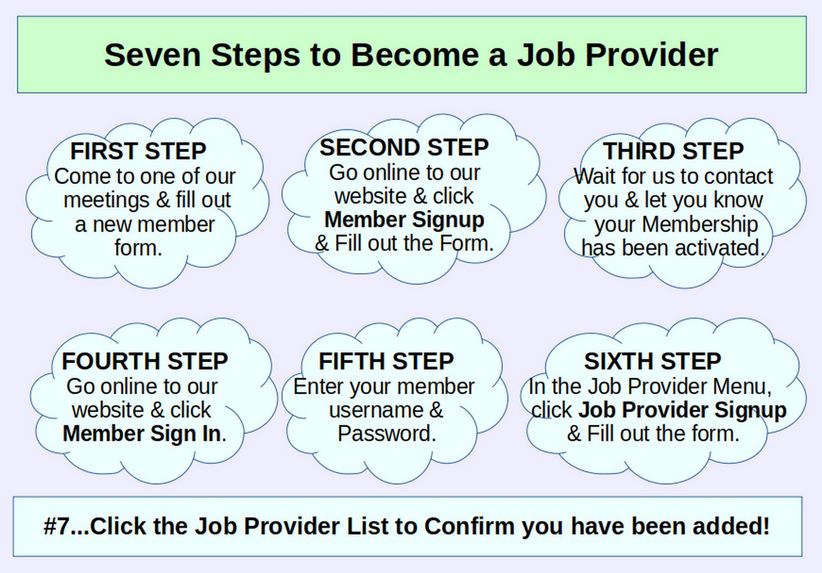
The third way is by signing up to be a Job Provider.
Historically, job providers were called Employers. However, we are using this term to describe anyone who wants to hire another person to provide a service for them. Job providers can include homeowners looking to hire a landscaper or plumber – or a parent looking to hire a teacher or mentor.

Are you a Service Provider or a Job Provider?

01

You can sign up for more than one group. However, you will need to fill out a personal member form and then fill out a form for each new provider you sign up for.

02

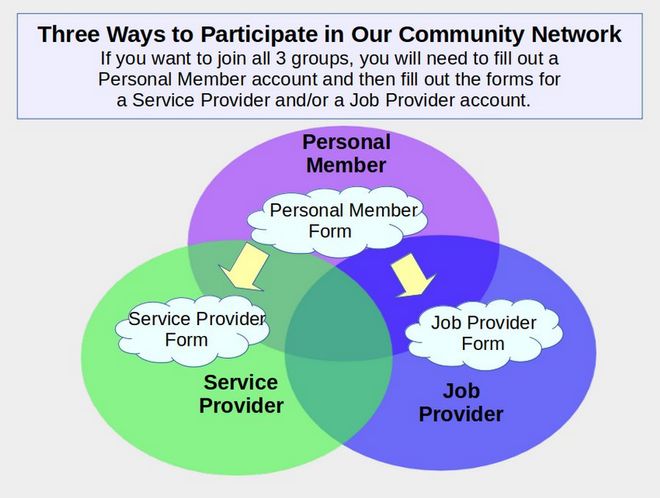
This means that if you want to be a Personal Member and a Service Provider you will need to fill out two forms – one for your personal member account and one for your Service Provider Info. If you want to be a Personal Member, a Service Provider and a Job Provider, you will need to fill out three forms.

3.2 Design your Member Registration Form

In the last article, we created our New Member Registration form. In this article, we will finish building this form. There are three basic steps to completing our custom Member Registration form. The first step is to decide which elements should be used in the Member Registration form and how these elements should be grouped. The second step is to create the groups that we will use on the Member Registration form. The third step is to add elements to each of our Member Registration form groups. In this article, we will take a closer look at all three of these steps.

Step 1 Decide which elements should be used in your Member Registration Form
Fabrik Forms can be divided into two different Types. These two types are New Member Registration forms (forms that create a new member) and Existing Member Information forms (forms that collect information about existing members but do not create a new member). These two types of forms use different elements because the Fabrik New Member Registration form needs to have elements that precisely replace and sync with the elements in the Joomla Registration form - while Fabrik Existing Member Information forms can contain any kind of information you need but should not contain any of the elements used in the New Member Registration form.

This separation of New Member Registration forms versus Existing Member Information forms is so important that I have created this graphic to help us remember the difference between these two types of Fabrik forms:

01

With Fabrik Existing Member Information forms, it is common to simply keep all of the questions in the default Fabrik group that is automatically created when you create the form and has the same name as the form. However, to clearly separate elements or questions needed to replace the normal Joomla Registration form questions, it is useful to divide your New Member Registration form questions into at least five groups.

The first group will be to hold some of the hidden Admin fields we will need when we create our Member Registration form. We will call this group 0 Admin Info. The second group of questions will be only those questions needed to replace the Joomla Registration form questions. We will call this group 1 Member Info. The third group will contain any other questions you want to ask new members. We will call this group 2 Join Our Teams. The fourth group contains questions where members can indicate options they want. We will call this group 3 Choose Member Options. The last group is used to separate the Form Spam Filter from the rest of the form. We will call this group 4 Prove you are human. You can add more groups of questions if you have a very long form that you need to break up. But for the sake of simplicity, we will just use these five basic groups. Therefore, in Step 2 below, we will create the five following groups:

3.3 Finish Your Member Registration Form

In our last article, we added elements to the first two groups in our custom Member Registration form. These elements are needed to connect our Fabrik Registration form with the Joomla User Management system. In this article, we will use the J User Plugin to connect our Fabrik elements to their Joomla elements. We will then finish adding the remaining elements needed for our custom Member Registration form.

Connect Your Fabrik Member Registration Elements with their Corresponding Joomla Core Registration Fields
These elements are the basic Joomla user registration fields. However, your Joomla database does not know these elements exist. We need to connect these elements to our Joomla database. Click on Forms and click on your Member Registration form to open it. Then click the Plug-ins tab.

01

Then click Add. For the -- do -- setting, select juser. For the In setting, select Both. For the On setting, select Both.

02

A new set of fields will appear below these fields called Binds data to a Joomla user account. It opens in the Fields tab. We will use this area to connect our Fabrik registration elements with their Joomla counterparts. In the Name field, select Member Full Name. For Username, select Member Username. For Password, select Member Password. For Email, select Member Email. For the Joomla Block field, select Member Block. For the Joomla User ID field, select Userid. For the Joomla User group field, select Member User group. For the Joomla Password Reset field, select Member Password Reset. Here is what these 8 fields should now look like:

3.4 Create Your Job and Service Provider Forms

In our last article, we finished the Fabrik Member Registration form and matched its elements to the default Joomla Registration form elements so that we can replace the Joomla Registration form with our custom Member Registration form. In this article, we will create our Job Provider and Service Provider forms.

Seven Steps to Become a Job Provider
We will create a separate form called Job Provider so we can handle Job Provider group permissions, display and access differently from our New Member Group permissions. Job Providers will first need to come to one of our meetings and fill out the Membership form. They will then need to go online and register as members – checking the box to be a Job Provider. They will then need to wait for their membership to be activated. They can then go back online and sign in with their Member username and password. They will then see a Job Provider menu where there will be the Job Provider Signup form that they will need to fill out. They can then click on the Job Provider List to confirm that they have been added to the List.

01

Create your Job Provider List, Form and Group
To create our Job Provider List, go to Lists and click New. For Label, type Job Provider. Then click on the Data tab. For Table name, type: ace_job_provider. Click Save. Leave the Content Type at Default. Click Save and Close. Then click the Job Provider Form to edit it. Click the Layout Tab. Change Show Title to No. Click Save & Close.

Add an Intro to the Job Provider Group
Rather than having the Job Provider Intro text at the beginning of the Job Provider form, it is better to place it inside the Job Provider Group. This will make it easier to hide this text on our Job Provider Profile Page. Here is the Job Provider Intro text: