
A custom registration form is the most important tool of any community network. While the Joomla Content Management System is a strong foundation for any website, the default Joomla Registration form suffers from two major problems. First, it is not customizable. It can not be adapted to the needs of our community network. Second, the default Joomla Registration form does not display a searchable list. Thus, there is no way for members to interact with other members. We will use the Fabrik Form Builder to create custom forms and searchable lists to help community members interact with each other. We will build three different forms in order to give new members three different ways to participate in our community network.
Three Ways to Participate in Our Community Network
One of our goals of our community network is to show how to help a local community rebuild their economy from the ground up. We do this by providing three different ways for new members to participate.
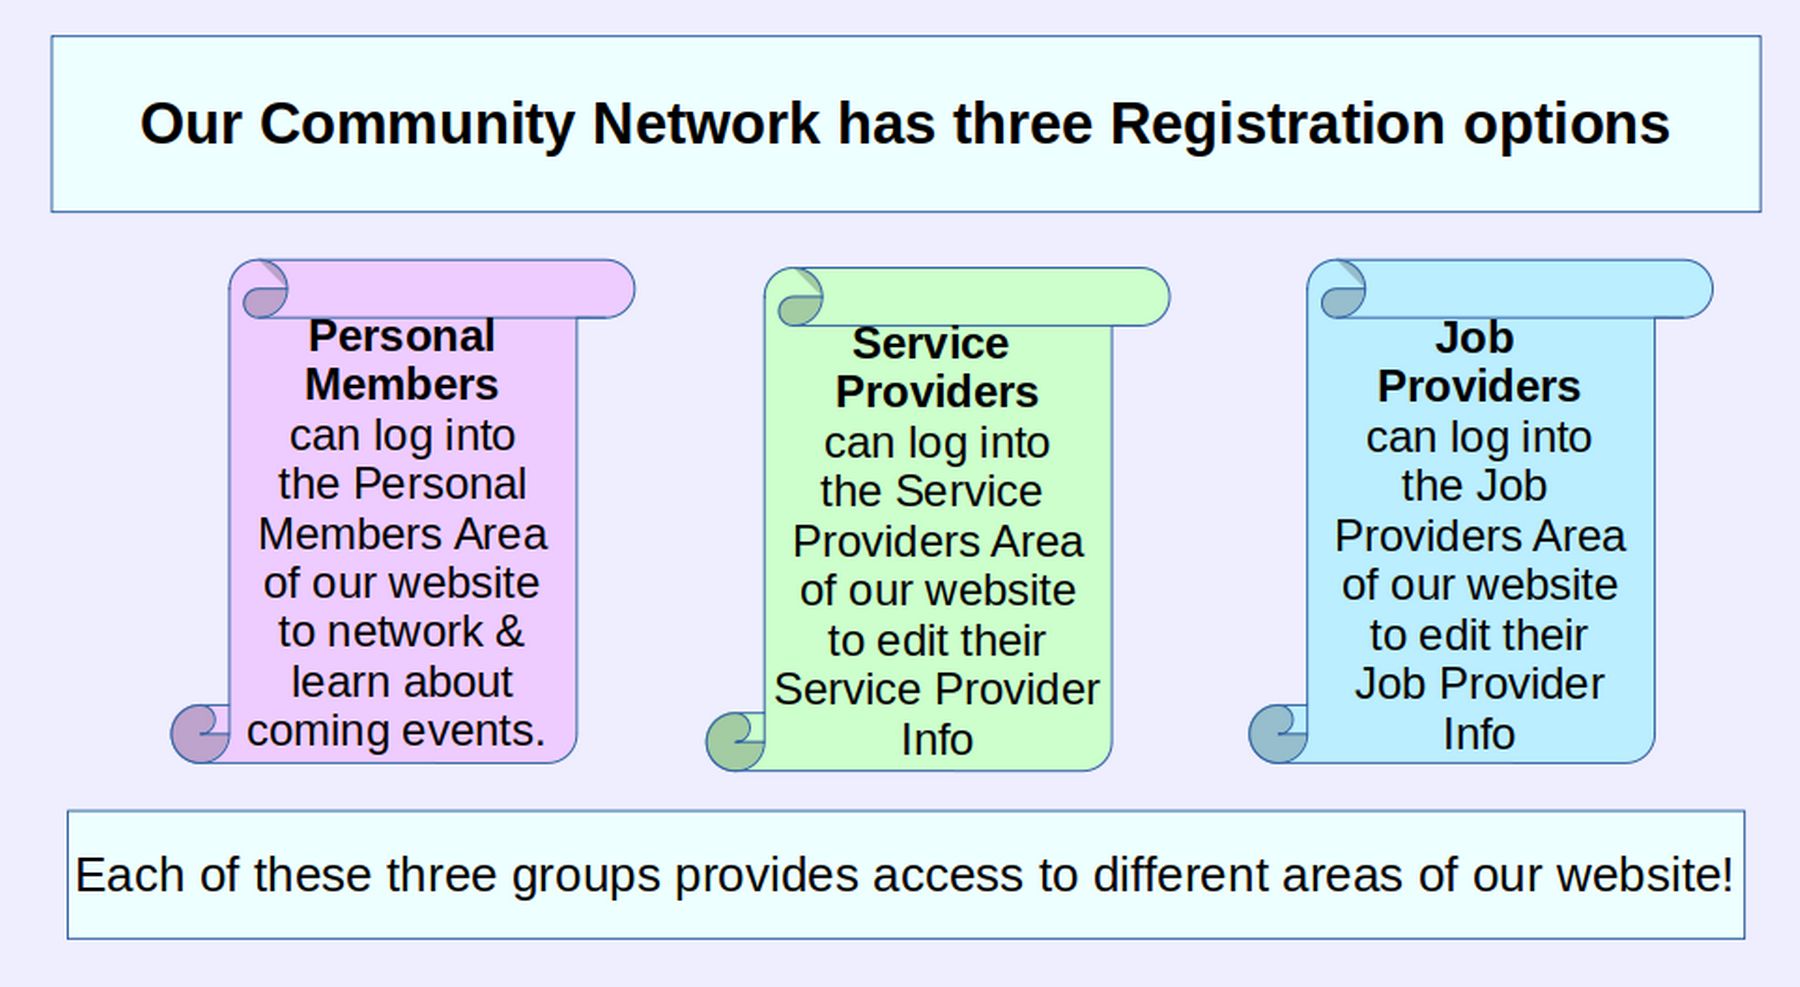
The first way is by signing up to be a New Member
All Members have access to coming events, newsletter articles and the ability to write their own articles and host their own events. to share with other members of the group.
The second way is by signing up to be a Service Provider
Historically, service providers were called Employees. However, we are using this term to describe anyone who wants to provide a service or product to another person or be hired by another person. Examples of Service Providers include plumbers, teachers, financial planners, landscapers, wellness coaches, singers, etc.
The third way is by signing up to be a Job Provider.
Historically, job providers were called Employers. However, we are using this term to describe anyone who wants to hire another person to provide a service for them. Job providers can include homeowners looking to hire a landscaper or plumber – or a parent looking to hire a teacher or mentor.
Are you a Service Provider or a Job Provider?

You can sign up for more than one group. However, you will need to fill out a personal member form and then fill out a form for each new provider you sign up for.
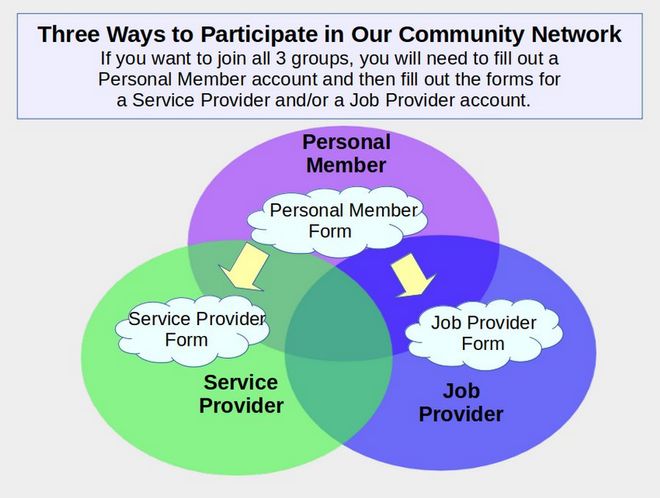
This means that if you want to be a Personal Member and a Service Provider you will need to fill out two forms – one for your personal member account and one for your Service Provider Info. If you want to be a Personal Member, a Service Provider and a Job Provider, you will need to fill out three forms.
What do you get for being a Member of our Network?
All members get the benefit of being able to share information with other members that share your values. Personal Members get a place to find jobs and find people who offer the services they need. Service Providers get a place to get jobs, network with customers and promote their skills and or local business. Job Providers get a place to find hire others to do the work they need done.
How does our community network work?
Service Providers enter the services they provide into a Searchable Service Provider Database. Here is a screen shot of what our Service Provider Searchable List looks like:
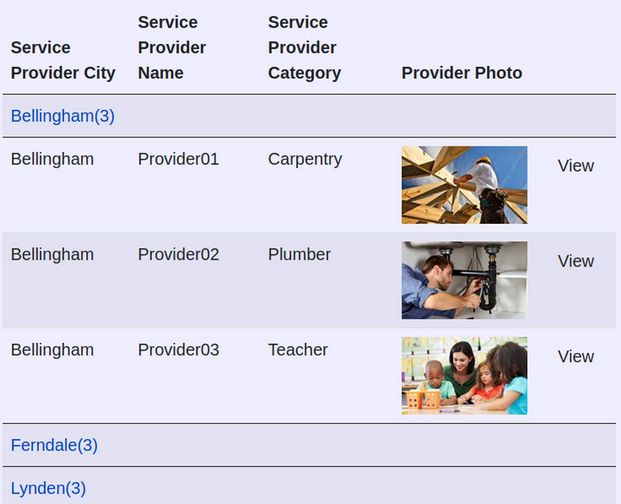
Members can then search this database by location and service category to find service providers near them. Members can then select the Profile pages for each Service Provider to learn more about them, the services they are offering and how to contact them for more information.
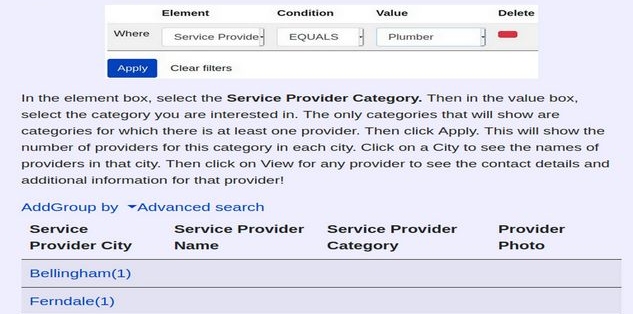
Here is a screen shot of what the Search Function looks like when searching the Service Provider Categories for a Plumber:
Job providers enter the jobs they are offering into a different Searchable List. Members can then search this List by location and job categories to find job providers near them. Members can then select the Profile pages for each Job Provider by clicking on VIEW to learn more about the jobs they offer and how to contact them for more information.
What does all of this cost?
There is no charge to become a Personal Member, a Job Provider or a Service Provider. Simply go to our website and sign up for a free personal account. Then just let us know you want a Service or Job provider account and we will set it up for you. Then just log in as a Personal Member and you will see the Service Provider and or Job Provider Sign Up menu item.
Next Steps to Economic Freedom
First we hope you will get a secure free email address and then sign up for your free Personal Membership. If your are looking for a secure place to get a free email address, we recommend ProtonMail dot com.
Second, you then need to let us know if you want a to be a Service Provider or a Job Provider. Third, we hope you will tell your family, friends and local business owners about this great opportunity.
To be approved for a Membership, all you need to do is come to one of our weekly meetings to sign up. Can’t make one of our weekly meetings? Then email one of the friendly people on our Membership Committee. Let them know where and how you found out about us and they will give you a special code to sign up.
Welcome to our community network – where we are restoring our local economy by building our own community network!
Steps to Build Our Community Network
To build our community network, we will create three Fabrik Forms.
Our Community Network Plan to Register New Members
Registration is done by first attending one of our meetings and filling out a new member form. Then go online and go to our website. There folks will see a menu item called Member Sign Up. Click on this menu item to open a form with an explanation of the benefits of joining our network. Folks will then fill out the new Member Registration form. Personal members can indicate which teams they are interested in joining and which Member Options they want. It is necessary to be approved as a Personal Member in order to be a Service Provider or Job Provider member. Once approved as a member, you can then access the Member area of our website where you can fill out either the Service Provider or Job Provider form.
Once their Member Registration form has been submitted, it will then be reviewed and approved by our Membership Coordinator and or someone on our Membership Team. Approval may take 1 to 2 days. Once approved, the new member can then log into their area of our website where they can edit the information on their Registration form or add more information if needed.
The information from each of these three forms can then be displayed on a Searchable List.
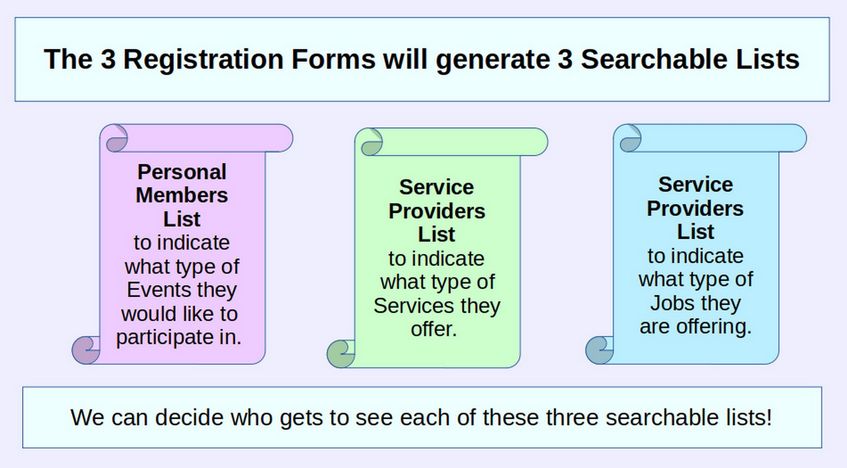
We can allow the public to view some of these forms, such as the Service Provider List, while only allowing registered members to view the Job Providers List and Member Coordinators to view the Member List.
How is each of these three forms created?
Here is an outline of the Fabrik Form Creation Process:
Step 1: Create a new Fabrik List which will automatically create a matching new form container.
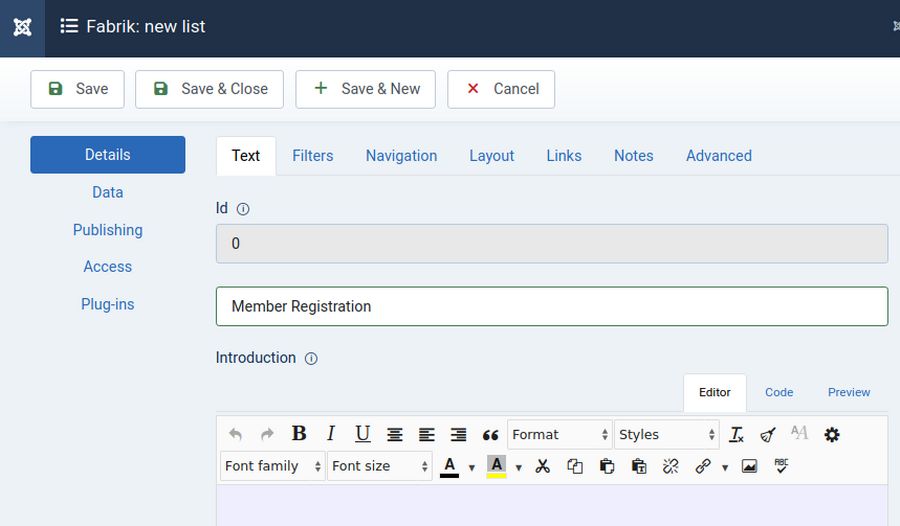
The first step is creation of a Replacement Joomla New Member Registration List and Form. Fabrik forms allow us to collect data from new members which we can later display in searchable lists. To create a custom New Member Registration List and form, in the Joomla Control Panel, click Components, Fabrik, Lists and then click the New button. Give the new List a Label such as Member Registration. But do not click Save yet!
Step 2 Add a 3 Letter Prefix to your Database Table Name
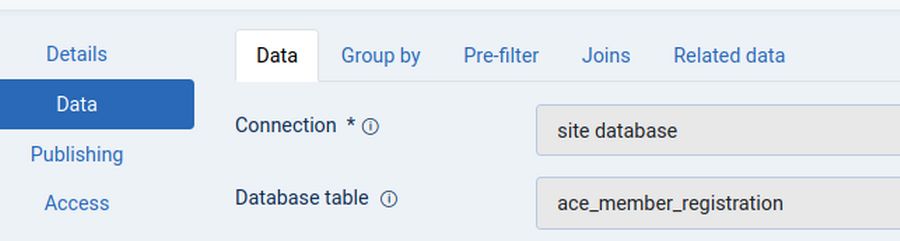
Before you click Save, click on the Data tab to change the table name of your Member Registration Table before saving your form. By default, the Table will have the same name as our List Label. But this is not what we want as our forms will have different names and without adding a prefix, they will be in different areas of our database.
In order to keep all of our Fabrik forms in the same place, we will save all of our Fabrik tables with the same three letter prefix. Our Joomla website has dozens of database tables. In order for our Fabrik Forms to appear at the top of our list of tables, we will use a three letter word beginning with the letter a as our table prefix. Here are some three letter words beginning with the letter a:
ace, act, age, add, aid, air, ask, art
Note that you will not be able to change the table name later. So if you want to keep your Database Tables together and at the top of the List, now is your only chance!
Use only lowercase letters and underscores to create your table names. We will use the word ace followed by an underscore and then the default name of our table. So our Member Registration form table will have the name ace_member_registration. Here is what this looks like on our Form Edit screen:
After you have added your 3 letter prefix to your table name, click Save. You will see the Fabrik: select content type screen:
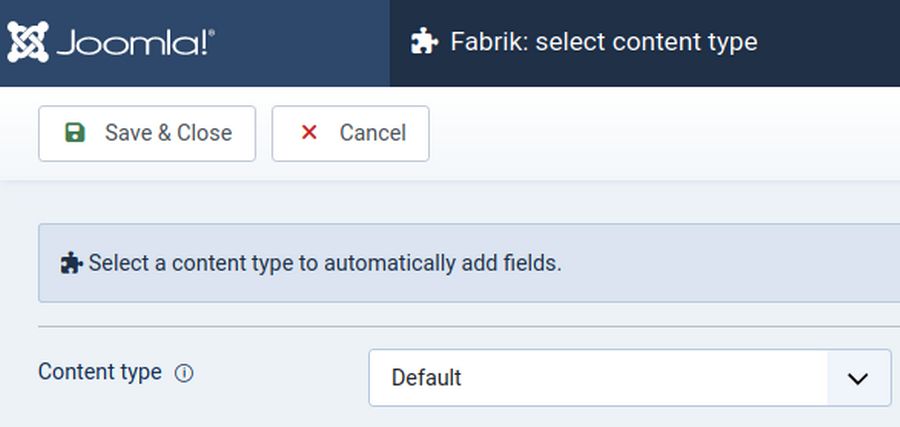
The default content type is called Default. But there are other content types… which should we choose? For our custom Registration form, we want to add our own fields. So leave the Content Type at default. Then click Save & Close.
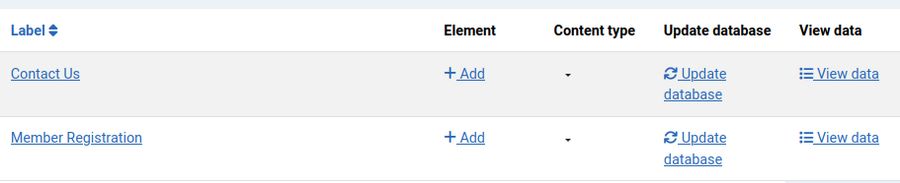
Then click on Forms. You will see a new form called Member Registration that was created when you created your Member Registration list. Your Member Registration form now appears in the Form Table along with the Contact Us form we created previously.
Step 3 Edit your New Member Registration Form
To edit your new Registration form, click on it to open it. This brings up the Form Edit screen.
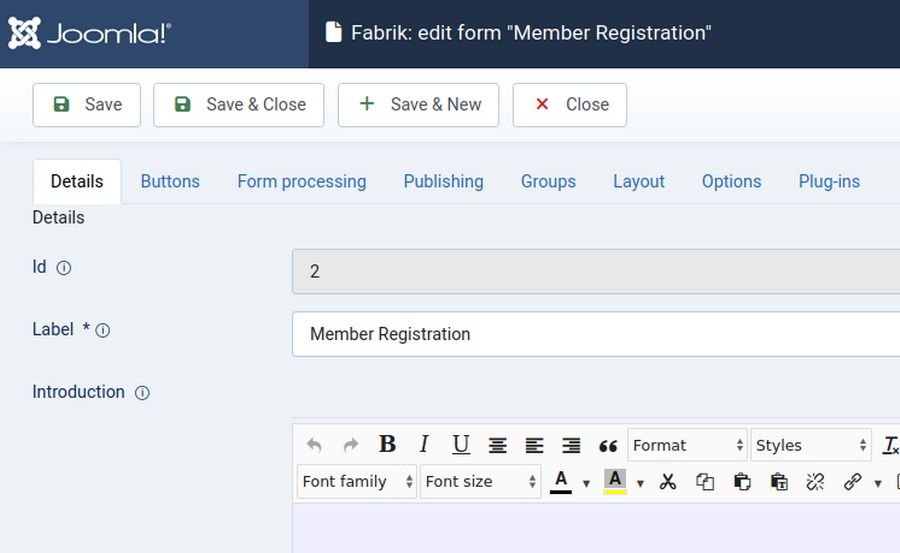
The Fabrik new form screen has 8 tabs. The first tab is called Details. For Label, it already uses Member Registration.
Below the Label box is an area called Introduction. Any text placed in the Introduction box will appear under the Registration form label. You could leave this box blank. But we want to provide new members with some instructions on what our group is about and some tips on how to fill out the form. So type this into the Introduction Box:
Thanks for joining our Community Network! The purpose of our network is to provide a place for those offering products and or skills to build relationships with other members of our community and also to provide those who want to support service providers with a place to find them.
Please fill out the following member registration form completely. Rest assured that your information will be kept secure and never shared with anyone outside of this group. For your Password, please make the password at least 8 characters and include Upper and Lower case letters and numbers. The password should have no blank spaces. You can also include special characters in your password if you wish. For example, you can use a password like JS#20214abc. Please write your password down somewhere to help you remember it.
Then scroll down the details screen and you will see a box called Error Message. Here you could change the message that appears when the form is not filled out properly. But just leave it blank as we will use the hidden default error message.
Below this is a box called Footer text. You could add a message to the bottom of the form explaining what will happen after they click on the Save button. But we will skip that for now. Scroll to the top and click on the Buttons tab. There are six buttons here. But five of them are set to Hide. Scroll down to the Save button which is set for Show:
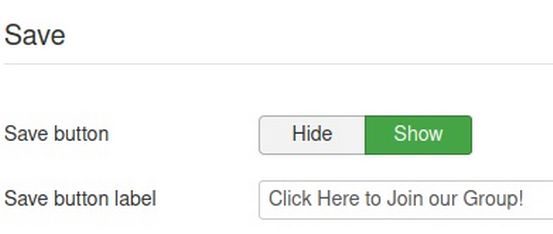
Change the Save button label from Save to Click Here to Join our Group! Then click Save and Close.
Click on Elements and you will see that Fabrik also created two elements called id and date-time.
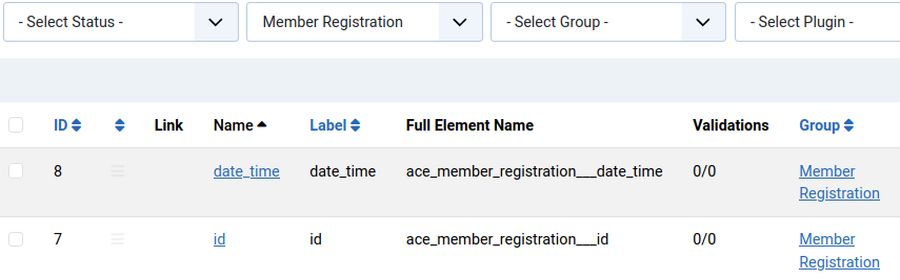
Note that these elements belong to a new group called Member Registration. Click on Groups to see this new group.

Step 4: Create the First Custom Form Group. Click on Fabrik Groups. Then click on the New button to give the Group a Label such as 1 Member Info. Then assign it to the Registration form. Then type in Description. We will do this in our next lesson.
Step 5: Create the Middle Form Groups by adding a Label and Description and assigning it to our Registration form.
Step 6: Create the Last Form Group by adding a Label and Description and assigning it to our Registration form.
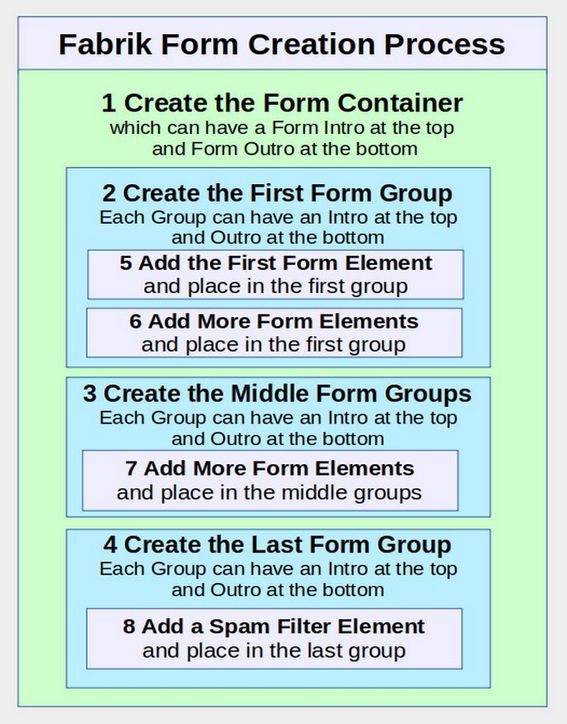
Step 7: Add the First Form Element to the First Form Group in the New Member Registration form. Go to Fabrik Elements and click New. For Label, type Member Name. For Name, type member-name. Then select the field plugin and the 1 Member Info group. We will do this in our next lesson.
Step 8: Add the remaining elements to the First Form Group.
We cover the remaining steps in more detail below.
Step 9: Add Form Elements to the Middle Form Groups
Step 10: Add a Spam Filter Element to the Last Form Group.
What’s Next?
We now have our custom member registration form with its two default elements. But before we add any more elements to this form, we need to create groups to put the elements in. Fabrik groups are different from Joomla groups in that Fabrik groups are containers for elements while Joomla groups are collections of users or members. In our next article, we will review how to plan the contents in your member registration form and add some custom Fabrik groups to help organize the elements in our form. We will then add some elements to our groups to finish our New Member Registration form.