
In our last article, we finished the Fabrik Member Registration form and matched its elements to the default Joomla Registration form elements so that we can replace the Joomla Registration form with our custom Member Registration form. In this article, we will create our Job Provider and Service Provider forms.
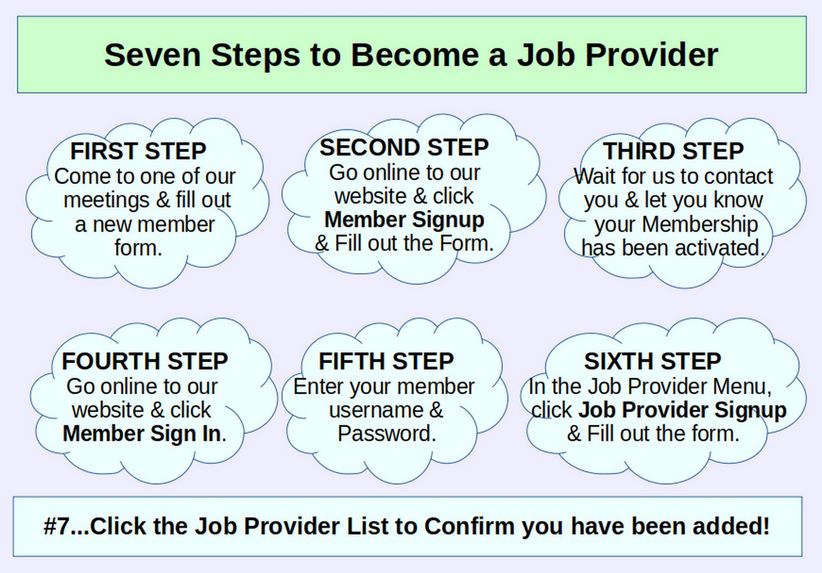
Seven Steps to Become a Job Provider
We will create a separate form called Job Provider so we can handle Job Provider group permissions, display and access differently from our New Member Group permissions. Job Providers will first need to come to one of our meetings and fill out the Membership form. They will then need to go online and register as members – checking the box to be a Job Provider. They will then need to wait for their membership to be activated. They can then go back online and sign in with their Member username and password. They will then see a Job Provider menu where there will be the Job Provider Signup form that they will need to fill out. They can then click on the Job Provider List to confirm that they have been added to the List.
Create your Job Provider List, Form and Group
To create our Job Provider List, go to Lists and click New. For Label, type Job Provider. Then click on the Data tab. For Table name, type: ace_job_provider. Click Save. Leave the Content Type at Default. Click Save and Close. Then click the Job Provider Form to edit it. Click the Layout Tab. Change Show Title to No. Click Save & Close.
Add an Intro to the Job Provider Group
Rather than having the Job Provider Intro text at the beginning of the Job Provider form, it is better to place it inside the Job Provider Group. This will make it easier to hide this text on our Job Provider Profile Page. Here is the Job Provider Intro text:
The website field below is optional. The rest of the fields are required as they are using by our Network Search Engine. For Provider Name, indicate either the name of your business or your name and the name of your job. For email, please indicate your business email or your personal email. Select 1 to 3 Job categories. To select more than one category, hold down the Control Key. If you do not see your Job Category in the current options, email us to add a Category. You can use the Job Provider Profile box to provide more details about the job you are offering including images and videos. To add an image, simply click on the Image Icon in the editor. To add a link to another web page, click on the link icon. You can also change the font size and font color. Please read our article on how to create your own Provider Photo before you upload your Provider Photo.
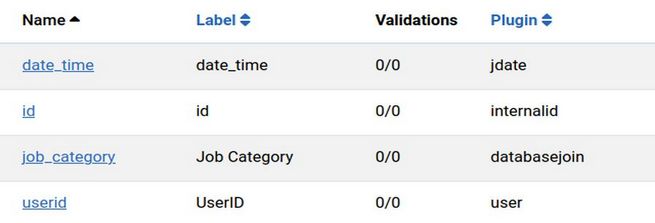
Click Save. Because we do not want to show this description, and several other elements on the Job Provider Details page, click the Layout tab. Change Show in form/details from Yes to Yes but hidden (details only). Then click Save and Close. Here are the elements that will be in the Job Provider group:
Create a Job Provider Details Group
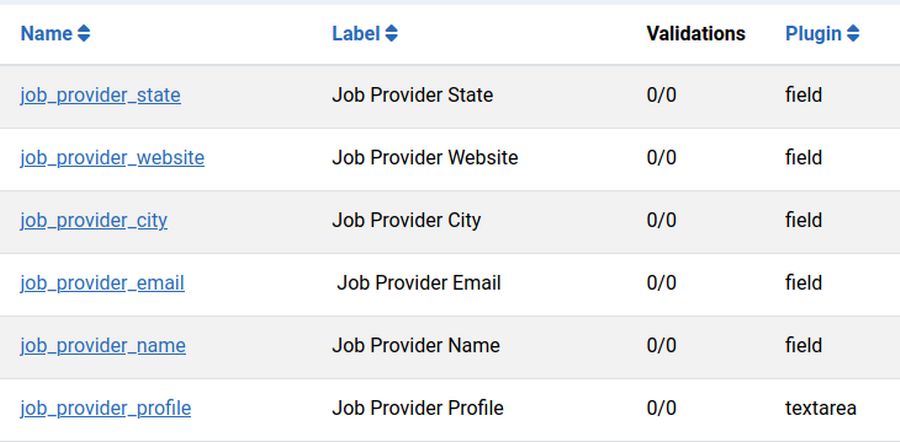
We need a separate group to hold our Job Provider Name, Email, Website, City, State and Profile elements. Go to Groups, click New and for Label, call the group Job Provider Details. For name, type job-provider-details. For form, select the Job Provider form. Leave the Intro box blank. Then click Save. Then click on the Layout tab. Note that Show in form/details is set for Yes. Leave it at Yes and click Save and Close. Here are the elements that will be in the Job Provider Details group:
Add Job Provider Name Box
Go to the Job Provider form and click Add to add our first element. First field: For Label, copy paste: Job Provider Name For Name, copy paste: job_provider_name. For Plugin, leave it at field. For group, select Job Provider Details. Then click Save and New.
Add a Job Provider Email Box
For Label, copy paste: Job Provider Email. For Name, copy paste: job_provider_email. For Plugin, leave it at field. For group, leave it at Job Provider Details. Then click on the Advanced tab and for Input type, select Email. Then click Save and New.
Add a Job Provider Website Box
For Label, type Job Provider Website. For Name, type job_provider_website. For plugin, leave it at Field. For Group, select Job Provider Details. Then click on the Advanced tab and change Input type to URL. Then click the Guess Link tab and change Guess Link Type to Yes and change Link Target to Open in a new window. Then click Save and New.
Add a Job Provider City box
For Label, type Job Provider City. For Name, type job_provider_city. For plugin, leave it at Field. For Group, select Job Provider Details. Then click Save and New.
Add a Job Provider State box For Label, type Job Provider State. For Name, type job_provider_state. For plugin, leave it at Field. For Group, select Job Provider Details. Then click Save and Close.
Add Job Category Form
We still need to add 2 more elements to our Job Provider Info form. These are Job Category and Job Provider Profile Page. However, because they have several options and may have more over time, and we want these to be searchable, we first need to create a special Job Category list and form. Because the Job Category needs its own custom form, we will add the Job Category element to our Job Provider form AFTER creating this special list and form.
Add a Job Categories List and Form
We want to have the ability to add a new Job Provider category if needed. The easiest way to do this is to create a Job Categories List which will also create a Job Categories form. The Job Categories form will only have one group called Job Categories. We will then add one element called Job Category Name. Then in Forms or List, click View Data to add the Category Names.
To add the Provider Categories List, click on Lists, New. For Label, type: Job Categories. Then click on the Data tab and for Table name, type: ace_job_categories. Click Save. Leave the Content Type at Default and click Save and Close.
Then click on the Job Categories form. For Intro, copy paste: This is a list of our job categories that can be searched by members looking for a job. Contact us if you want to add a new category.
Then click Save and Close.
Add a Job Category Name Element to the Job Category Form
In Fabrik Forms, click on Job Categories Add to add a new element. For the Label, type Job Category Name. It will automatically add a Name with the same text but in lower case with no spaces. Also remember to change the group to the Job Categories group. Then click Save and Close. Then go to Elements and change the Filter, Form to Job Categories. Then to the right of the new element, click Show in List. Also hide the ID and time elements from the list.
Add Categories to the Job Category List
In Forms or List, in the Job Category row, click View Data. Then click Add in the upper left corner to add the Category Names.

Type in our first category, Accounting. Then click Save and Add to add each remaining category. This is where we will add our initial 40 Service Provider categories (we can always add more later).
Accounting
Alternative Medicine
Bookkeeping
Business Services
Cafes and Restaurants
Car and Truck Repair
Carpentry
Childcare
Church Religious Spiritual
Computer Repair
Construction/Contractor
Cosmetic and Hair Styling
Counseling
Dental Services
Electrician
Entertainment
Farmer
Food
Gardening and Seed Sharing
Health and Wellness
Hotel and Shared Housing
Landscaping
Legal Aid
Media and Video Production
Mentoring
Nonprofit Group
Nurse
Painter
Plumber
Teacher
Tourism and Travel
Transportation
Veterinary and Animal Care
Volunteer
Website Services
Other Please Add
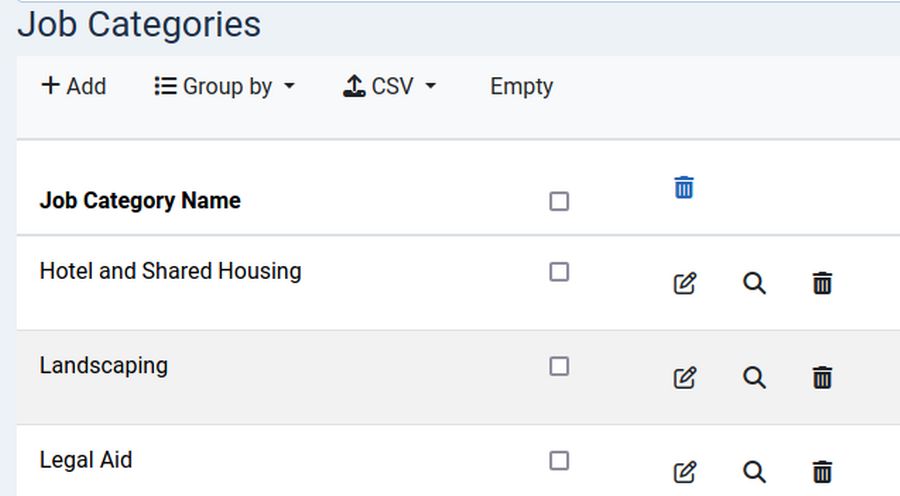
Here is what the top of our finished list looks like:
Add a Database Join Element to Connect our Job Provider Form to our Job Category form
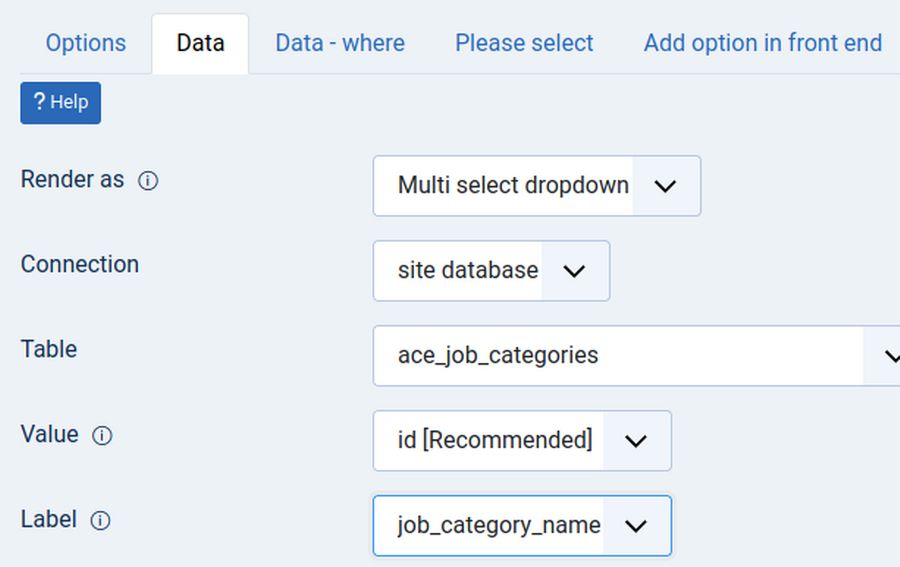
Go to Forms, Job Provider form row. Then click Add to add a new element. For Label, type Job Category. For Name, type job_category. For plugin, select database join. For group, select Job Provider. Then click on the Data tab. Change Render As from Drop Down to MultiSelect DropDown. For table, select Job Categories. For Value, select ID. For label, select Job Category Name.
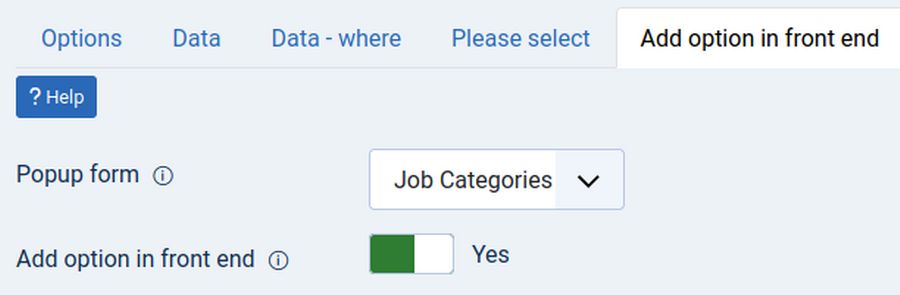
Then click on Add option in front end. Change Add option in front end from No to Yes. Then click Save to confirm the Job Categories form was found for the Popup form.
Then click Save and New.
Add a User ID element
For Label, type UserID. For name, type userid. For plugin, select User. For group, select Job Provider. For Show, change it to Hidden. Then click Save and New.
Add a Job Provider Profile Box with Editor
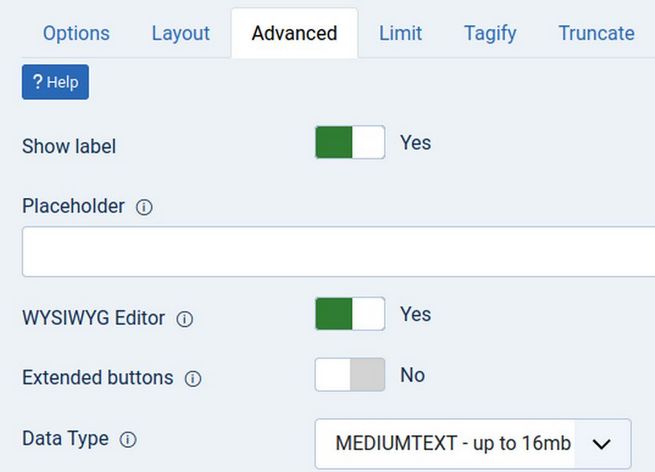
Next, add a Job Provider Profile box. For Label, type Job Provider Profile. For name, type job_provider_profile. For plugin, select textarea. For Group, select Job Provider Details. Click the Layout tab and change width to input-xlarge and Height to 30. Click the Advanced tab and change Show Label to Yes. WYSIWYG Editor to Yes, Extended buttons to No and Data to 16MB.
Then click Save and Close.
Select the elements to display in the Job Provider List
Click Fabrik Elements. Then filter for the Job Provider form. Move the Job Provider City to the top of the list. For show in list, leave everything unchecked except City, Name and Category.
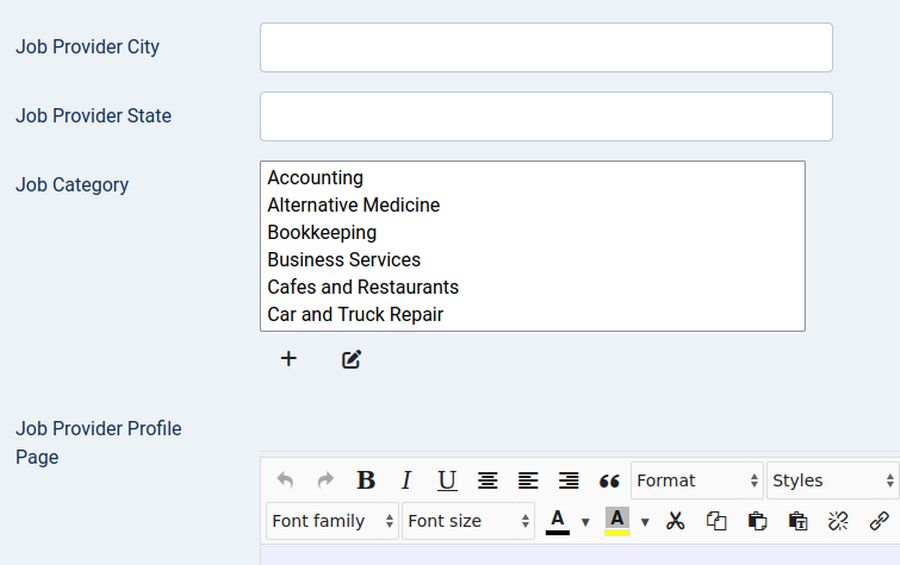
View the Job Provider Form
To View the Provider form in the back end, click Forms, Job Provider View Data. Then click Add. Here is the top of the form:
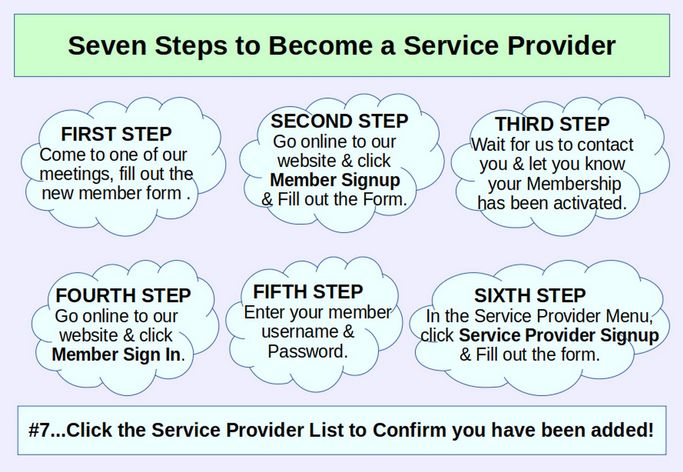
Seven Steps to become a Service Provider
The steps for Service Provider are similar to Job Provider:
Create a Similar Service Provider List and Form
To create our Service Provider List, go to Lists and click New. For List Label, type Service Provider. Then click on the Data tab. For Table name, type: ace_service_provider. Click Save. Leave the Content Type at Default. Click Save and Close. Then click the Service Provider Form to edit it. Click the Layout Tab and change Show Title to No. Then click Save and Close.
Add an Intro to the Service Provider Group
Rather than having the Service Provider Intro text at the beginning of the Service Provider form, it is better to place it inside the Service Provider Group. This will make it easier to hide this text on our Service Provider Profile Page. Here is the Service Provider Intro text:
The website field below is optional. The rest of the fields are required as they are using by our Network Search Engine. For Provider Name, please indicate either the name of your business or your name and the name of your service. For email, please indicate your business email or your personal email. Select 1 to 3 Service categories. To select more than one category, hold down the Control Key. If you do not see your Service Category in the current options, email us to add a Category. You can use the Service Provider Profile Box to provide more details about the service you are offering including images and videos if you wish. To add an image, simply click on the Image Icon in the editor. To add a link to another web page, click on the link icon. You can also change the font family, font size and font color. Please read our article on how to create your own Provider Photo before you upload your Provider Photo.
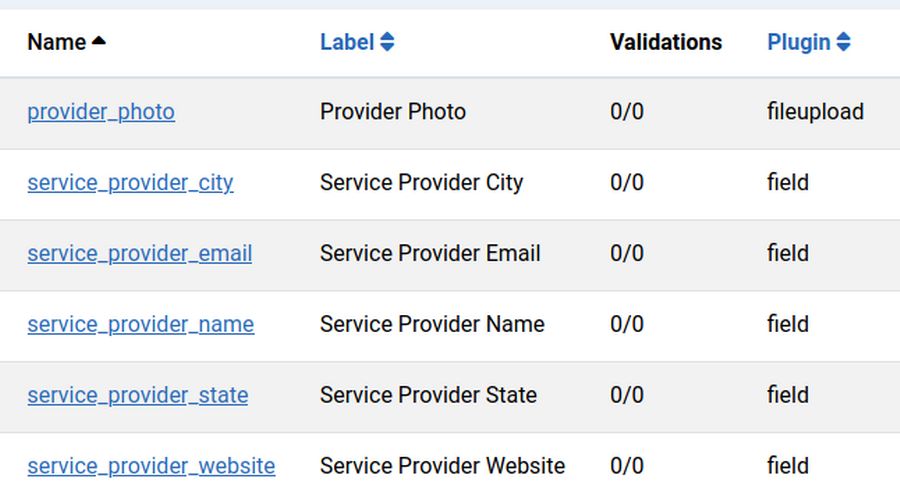
Elements in the Service Provider Group

Create a Service Provider Details Group
We need a separate group to hold our Service Provider Name, Email, Website, City and State elements. Go to Groups, click New and for Label, type Service Provider Details. For name, type service-provider-details. For form, select the Service Provider form. Leave the Intro box blank. Then click Save. Then click on the Layout tab. Note that Show in form/details is set for Yes. Click Save and Close.
Elements in the Service Provider Details group
Create a Service Provider Profile Group
We need a separate group to hold our Service Provider Profile element. Go to Groups, click New and for Label, type Service Provider Profile. For Name, type service-provider-profile-page. For form, select the Service Provider form. Then click Save and Close.
Add Service Provider Name Box
Go to the Service Provider form and click Add. For Label, copy paste: Service Provider Name For Name, copy paste: service_provider_name. For Plugin, leave it at field. For group, select Service Provider Details. Then click Save and New.
Add a Service Provider Email Box
For Label, copy paste: Service Provider Email. For Name, copy paste: service_provider_email. For Plugin, leave it at field. For group, leave it at Service Provider Details. Then click on the Advanced tab and for Input type, select Email. Then click Save and New.
Add a Service Provider Website Box
For Label, type Service Provider Website. For Name, type service_provider_website. For plugin, leave it at Field. For Group, select Service Provider Details. Then click on the Advanced tab and change Input type to URL. Then click the Guess Link tab and change Guess Link Type to Yes and change Link Target to Open in a new window. Then click Save and New.
Add a Service Provider City box
For Label, type Service Provider City. For Name, type service_provider_city. For plugin, leave it at Field. For Group, select Service Provider Details. Then click Save and New.
Add a Service Provider State box For Label, type Service Provider State. For Name, type service_provider_state. For plugin, leave it at Field. For Group, select Service Provider Details. Then click Save and Close.
Add Service Categories List and Form
Make a new List identical to the Job Categories List but called Service Categories with the Table name ace_service_categories Then click Save. Then Save and Close.
Add an element to this form called Service Provider Category. Place it in the Service Categories group. Then click Save and Close. Then hide the time and ID elements from the List and show just the Service Provider Category. Then go Go to View Data Add to add all of the categories we previously added to the Job Categories List.
Add a Database Join Element to Connect our Service Provider Form to our Service Category.
Go to Forms, Service Provider form. Then click Add to add a new element. For Label, type Service Category. For Name, type service_category. For plugin, select database join. For group, select Service Provider. Then click on the Data tab. Change Render As from Drop Down to MultiSelect DropDown. For table, select Service Categories. For Value, select ID. For label, select Service Category. Then click on Add option in front end. Change Add option in front end from No to Yes. Then click Save and verify the Popup. Then click Save and New.
Add a Service Provider Image Upload Element
For Label, type Provider Photo For name, type: provider_photo
For plugin, change it to fileupload. For group, leave it at Service Provider Details. Image settings have 8 tabs. Here are the first 7:
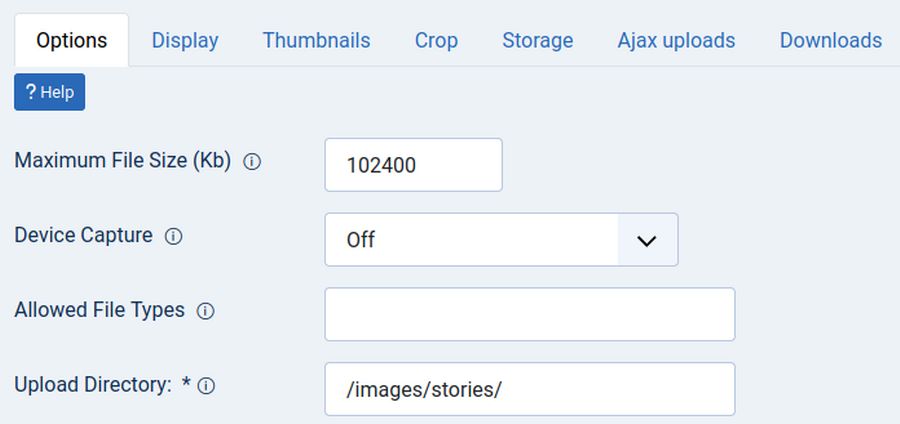
On the Options tab, reduce Maximum File Size to 200. Then change the upload directory to: /images/members/{$my→username} Then click Save & Close.
To insure providers can load images, go to Content, Media, Options and copy the Legal image extensions:
bmp,gif,jpg,png,jpeg,webp,avif
Then close the Media screen and go to the Provider Photo element to edit it. Paste these extensions in the Allowed File Type box.
Then click the Ajax Uploads tab and change Use Ajax Upload fro No to Yes. Then click Save and Close.
We will also write an article about how to create, resize, crop and upload a Provider Photo for the Service Provider menu.
Add a User ID element
For Label, type UserID. For name, type userid. For plugin, select User. For group, select Service Provider. For Show, change it to Hidden. Then click Save and New.
Add a Service Provider Profile Box
For Label, type Service Provider Profile. For name, type service_provider_profile. For plugin, select textarea. For Group, select Service Provider Profile. Click the Layout tab and change width to input-xlarge and Height to 30. Click the Advanced tab and change Show Label to Yes. WYSIWYG Editor to Yes, Extended buttons to No and Data Type to 16MB. Then click Save and Close.
Select the elements to display in the Service Provider List
Click on Fabrik Elements. Then filter for the Service Provider form. Move the Service Provider City to the top of the list. For show in list, leave everything unchecked except Service Provider City, Service Provider Name and Service Category and Provider Photo.
Set Access to the Edit Icon for the Service Provider List
To prevent the public from being able to edit the Service Provider List, we need to change the access to the Edit icon. Go to Lists, Service Provider, Access and change it to the following:
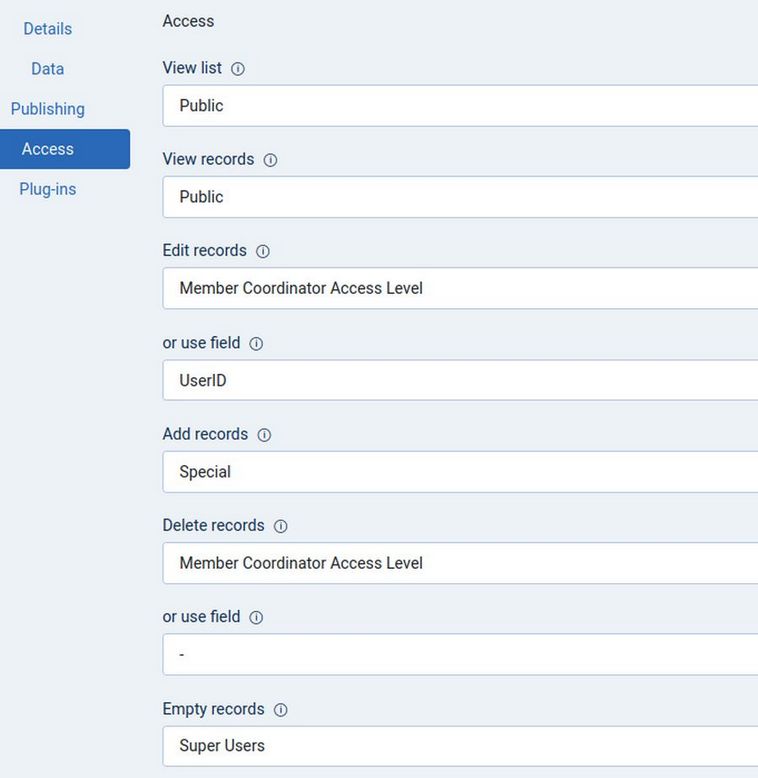
Also change Job Provider Access to the same except set view list and view records to Registered instead of Public:
View the Service Provider Info List To View the Service Provider Info form in the back end, click Forms, Service Provider, View Data. Then click Add. Here is the top of the Service Provider form:
Note that Service Category is a Multi Select Database Join element. The Plus signs allow us to add new Categories on the back end but the plus signs are not present on the front end. So folks need to email us if they want to add a new city or category. Here is the rest of the Service Provider form:
The editor will enable Service Providers to add images, videos and links to web pages to help members better understand the services they offer.
Congratulations! You have now completed your Job Provider and Service Provider Info forms.
What’s Next?
In the next article, we will set up front end menu items so we can add our Demo Members to test how well our new Job and Service Provider Network works.
In our last article, we finished the Fabrik Member Registration form and matched its elements to the default Joomla Registration form elements so that we can replace the Joomla Registration form with our custom Member Registration form. In this article, we will create our Job Provider and Service Provider forms.
Seven Steps to Become a Job Provider
We will create a separate form called Job Provider so we can handle Job Provider group permissions, display and access differently from our New Member Group permissions. Job Providers will first need to come to one of our meetings and fill out the Membership form. They will then need to go online and register as members – checking the box to be a Job Provider. They will then need to wait for their membership to be activated. They can then go back online and sign in with their Member username and password. They will then see a Job Provider menu where there will be the Job Provider Signup form that they will need to fill out. They can then click on the Job Provider List to confirm that they have been added to the List.
01
Create your Job Provider List, Form and Group
To create our Job Provider List, go to Lists and click New. For Label, type Job Provider. Then click on the Data tab. For Table name, type: ace_job_provider. Click Save. Leave the Content Type at Default. Click Save and Close. Then click the Job Provider Form to edit it. Click the Layout Tab. Change Show Title to No. Click Save & Close.
Add an Intro to the Job Provider Group
Rather than having the Job Provider Intro text at the beginning of the Job Provider form, it is better to place it inside the Job Provider Group. This will make it easier to hide this text on our Job Provider Profile Page. Here is the Job Provider Intro text:
The website field below is optional. The rest of the fields are required as they are using by our Network Search Engine. For Provider Name, indicate either the name of your business or your name and the name of your job. For email, please indicate your business email or your personal email. Select 1 to 3 Job categories. To select more than one category, hold down the Control Key. If you do not see your Job Category in the current options, email us to add a Category. You can use the Job Provider Profile box to provide more details about the job you are offering including images and videos. To add an image, simply click on the Image Icon in the editor. To add a link to another web page, click on the link icon. You can also change the font size and font color. Please read our article on how to create your own Provider Photo before you upload your Provider Photo.
Click Save. Because we do not want to show this description, and several other elements on the Job Provider Details page, click the Layout tab. Change Show in form/details from Yes to Yes but hidden (details only). Then click Save and Close. Here are the elements that will be in the Job Provider group:
02
Create a Job Provider Details Group
We need a separate group to hold our Job Provider Name, Email, Website, City, State and Profile elements. Go to Groups, click New and for Label, call the group Job Provider Details. For name, type job-provider-details. For form, select the Job Provider form. Leave the Intro box blank. Then click Save. Then click on the Layout tab. Note that Show in form/details is set for Yes. Leave it at Yes and click Save and Close. Here are the elements that will be in the Job Provider Details group:
03
Add Job Provider Name Box
Go to the Job Provider form and click Add to add our first element. First field: For Label, copy paste: Job Provider Name For Name, copy paste: job_provider_name. For Plugin, leave it at field. For group, select Job Provider Details. Then click Save and New.
Add a Job Provider Email Box
For Label, copy paste: Job Provider Email. For Name, copy paste: job_provider_email. For Plugin, leave it at field. For group, leave it at Job Provider Details. Then click on the Advanced tab and for Input type, select Email. Then click Save and New.
Add a Job Provider Website Box
For Label, type Job Provider Website. For Name, type job_provider_website. For plugin, leave it at Field. For Group, select Job Provider Details. Then click on the Advanced tab and change Input type to URL. Then click the Guess Link tab and change Guess Link Type to Yes and change Link Target to Open in a new window. Then click Save and New.
Add a Job Provider City box
For Label, type Job Provider City. For Name, type job_provider_city. For plugin, leave it at Field. For Group, select Job Provider Details. Then click Save and New.
Add a Job Provider State box For Label, type Job Provider State. For Name, type job_provider_state. For plugin, leave it at Field. For Group, select Job Provider Details. Then click Save and Close.
Add Job Category Form
We still need to add 2 more elements to our Job Provider Info form. These are Job Category and Job Provider Profile Page. However, because they have several options and may have more over time, and we want these to be searchable, we first need to create a special Job Category list and form. Because the Job Category needs its own custom form, we will add the Job Category element to our Job Provider form AFTER creating this special list and form.
Add a Job Categories List and Form
We want to have the ability to add a new Job Provider category if needed. The easiest way to do this is to create a Job Categories List which will also create a Job Categories form. The Job Categories form will only have one group called Job Categories. We will then add one element called Job Category Name. Then in Forms or List, click View Data to add the Category Names.
To add the Provider Categories List, click on Lists, New. For Label, type: Job Categories. Then click on the Data tab and for Table name, type: ace_job_categories. Click Save. Leave the Content Type at Default and click Save and Close.
Then click on the Job Categories form. For Intro, copy paste: This is a list of our job categories that can be searched by members looking for a job. Contact us if you want to add a new category.
Then click Save and Close.
Add a Job Category Name Element to the Job Category Form
In Fabrik Forms, click on Job Categories Add to add a new element. For the Label, type Job Category Name. It will automatically add a Name with the same text but in lower case with no spaces. Also remember to change the group to the Job Categories group. Then click Save and Close. Then go to Elements and change the Filter, Form to Job Categories. Then to the right of the new element, click Show in List. Also hide the ID and time elements from the list.
Add Categories to the Job Category List
In Forms or List, in the Job Category row, click View Data. Then click Add in the upper left corner to add the Category Names.
04
Type in our first category, Accounting. Then click Save and Add to add each remaining category. This is where we will add our initial 40 Service Provider categories (we can always add more later).
Accounting
Alternative Medicine
Bookkeeping
Business Services
Cafes and Restaurants
Car and Truck Repair
Carpentry
Childcare
Church Religious Spiritual
Computer Repair
Construction/Contractor
Cosmetic and Hair Styling
Counseling
Dental Services
Electrician
Entertainment
Farmer
Food
Gardening and Seed Sharing
Health and Wellness
Hotel and Shared Housing
Landscaping
Legal Aid
Media and Video Production
Mentoring
Nonprofit Group
Nurse
Painter
Plumber
Teacher
Tourism and Travel
Transportation
Veterinary and Animal Care
Volunteer
Website Services
Other Please Add
Here is what the top of our finished list looks like:
05
Add a Database Join Element to Connect our Job Provider Form to our Job Category form
Go to Forms, Job Provider form row. Then click Add to add a new element. For Label, type Job Category. For Name, type job_category. For plugin, select database join. For group, select Job Provider. Then click on the Data tab. Change Render As from Drop Down to MultiSelect DropDown. For table, select Job Categories. For Value, select ID. For label, select Job Category Name.
06
Then click on Add option in front end. Change Add option in front end from No to Yes. Then click Save to confirm the Job Categories form was found for the Popup form.
07
Then click Save and New.
Add a User ID element
For Label, type UserID. For name, type userid. For plugin, select User. For group, select Job Provider. For Show, change it to Hidden. Then click Save and New.
Add a Job Provider Profile Box with Editor
Next, add a Job Provider Profile box. For Label, type Job Provider Profile. For name, type job_provider_profile. For plugin, select textarea. For Group, select Job Provider Details. Click the Layout tab and change width to input-xlarge and Height to 30. Click the Advanced tab and change Show Label to Yes. WYSIWYG Editor to Yes, Extended buttons to No and Data to 16MB.
08
Then click Save and Close.
Select the elements to display in the Job Provider List
Click Fabrik Elements. Then filter for the Job Provider form. Move the Job Provider City to the top of the list. For show in list, leave everything unchecked except City, Name and Category.
View the Job Provider Form
To View the Provider form in the back end, click Forms, Job Provider View Data. Then click Add. Here is the top of the form:
09
Seven Steps to become a Service Provider
The steps for Service Provider are similar to Job Provider:
10
Create a Similar Service Provider List and Form
To create our Service Provider List, go to Lists and click New. For List Label, type Service Provider. Then click on the Data tab. For Table name, type: ace_service_provider. Click Save. Leave the Content Type at Default. Click Save and Close. Then click the Service Provider Form to edit it. Click the Layout Tab and change Show Title to No. Then click Save and Close.
Add an Intro to the Service Provider Group
Rather than having the Service Provider Intro text at the beginning of the Service Provider form, it is better to place it inside the Service Provider Group. This will make it easier to hide this text on our Service Provider Profile Page. Here is the Service Provider Intro text:
The website field below is optional. The rest of the fields are required as they are using by our Network Search Engine. For Provider Name, please indicate either the name of your business or your name and the name of your service. For email, please indicate your business email or your personal email. Select 1 to 3 Service categories. To select more than one category, hold down the Control Key. If you do not see your Service Category in the current options, email us to add a Category. You can use the Service Provider Profile Box to provide more details about the service you are offering including images and videos if you wish. To add an image, simply click on the Image Icon in the editor. To add a link to another web page, click on the link icon. You can also change the font family, font size and font color. Please read our article on how to create your own Provider Photo before you upload your Provider Photo.
Elements in the Service Provider Group
11
Create a Service Provider Details Group
We need a separate group to hold our Service Provider Name, Email, Website, City and State elements. Go to Groups, click New and for Label, type Service Provider Details. For name, type service-provider-details. For form, select the Service Provider form. Leave the Intro box blank. Then click Save. Then click on the Layout tab. Note that Show in form/details is set for Yes. Click Save and Close.
Elements in the Service Provider Details group
12
Create a Service Provider Profile Group
We need a separate group to hold our Service Provider Profile element. Go to Groups, click New and for Label, type Service Provider Profile. For Name, type service-provider-profile-page. For form, select the Service Provider form. Then click Save and Close.
Add Service Provider Name Box
Go to the Service Provider form and click Add. For Label, copy paste: Service Provider Name For Name, copy paste: service_provider_name. For Plugin, leave it at field. For group, select Service Provider Details. Then click Save and New.
Add a Service Provider Email Box
For Label, copy paste: Service Provider Email. For Name, copy paste: service_provider_email. For Plugin, leave it at field. For group, leave it at Service Provider Details. Then click on the Advanced tab and for Input type, select Email. Then click Save and New.
Add a Service Provider Website Box
For Label, type Service Provider Website. For Name, type service_provider_website. For plugin, leave it at Field. For Group, select Service Provider Details. Then click on the Advanced tab and change Input type to URL. Then click the Guess Link tab and change Guess Link Type to Yes and change Link Target to Open in a new window. Then click Save and New.
Add a Service Provider City box
For Label, type Service Provider City. For Name, type service_provider_city. For plugin, leave it at Field. For Group, select Service Provider Details. Then click Save and New.
Add a Service Provider State box For Label, type Service Provider State. For Name, type service_provider_state. For plugin, leave it at Field. For Group, select Service Provider Details. Then click Save and Close.
Add Service Categories List and Form
Make a new List identical to the Job Categories List but called Service Categories with the Table name ace_service_categories Then click Save. Then Save and Close.
Add an element to this form called Service Provider Category. Place it in the Service Categories group. Then click Save and Close. Then hide the time and ID elements from the List and show just the Service Provider Category. Then go Go to View Data Add to add all of the categories we previously added to the Job Categories List.
Add a Database Join Element to Connect our Service Provider Form to our Service Category.
Go to Forms, Service Provider form. Then click Add to add a new element. For Label, type Service Category. For Name, type service_category. For plugin, select database join. For group, select Service Provider. Then click on the Data tab. Change Render As from Drop Down to MultiSelect DropDown. For table, select Service Categories. For Value, select ID. For label, select Service Category. Then click on Add option in front end. Change Add option in front end from No to Yes. Then click Save and verify the Popup. Then click Save and New.
Add a Service Provider Image Upload Element
For Label, type Provider Photo For name, type: provider_photo
For plugin, change it to fileupload. For group, leave it at Service Provider Details. Image settings have 8 tabs. Here are the first 7:
13
On the Options tab, reduce Maximum File Size to 200. Then change the upload directory to: /images/members/{$my→username} Then click Save & Close.
To insure providers can load images, go to Content, Media, Options and copy the Legal image extensions:
bmp,gif,jpg,png,jpeg,webp,avif
Then close the Media screen and go to the Provider Photo element to edit it. Paste these extensions in the Allowed File Type box.
Then click the Ajax Uploads tab and change Use Ajax Upload fro No to Yes. Then click Save and Close.
We will also write an article about how to create, resize, crop and upload a Provider Photo for the Service Provider menu.
Add a User ID element
For Label, type UserID. For name, type userid. For plugin, select User. For group, select Service Provider. For Show, change it to Hidden. Then click Save and New.
Add a Service Provider Profile Box
For Label, type Service Provider Profile. For name, type service_provider_profile. For plugin, select textarea. For Group, select Service Provider Profile. Click the Layout tab and change width to input-xlarge and Height to 30. Click the Advanced tab and change Show Label to Yes. WYSIWYG Editor to Yes, Extended buttons to No and Data Type to 16MB. Then click Save and Close.
Select the elements to display in the Service Provider List
Click on Fabrik Elements. Then filter for the Service Provider form. Move the Service Provider City to the top of the list. For show in list, leave everything unchecked except Service Provider City, Service Provider Name and Service Category and Provider Photo.
Set Access to the Edit Icon for the Service Provider List
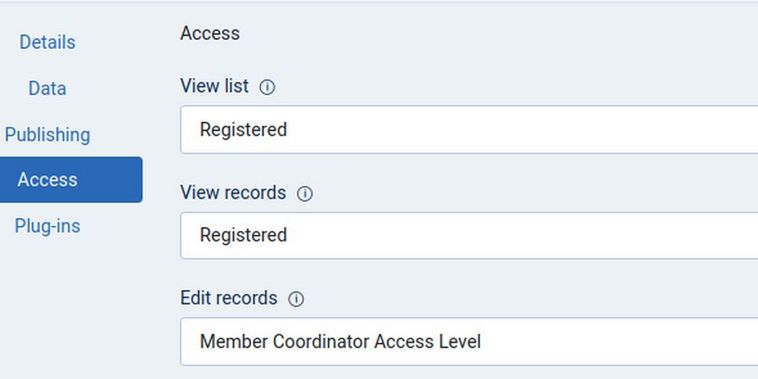
To prevent the public from being able to edit the Service Provider List, we need to change the access to the Edit icon. Go to Lists, Service Provider, Access and change it to the following:
14
Also change Job Provider Access to the same except set view list and view records to Registered instead of Public:
15
View the Service Provider Info List To View the Service Provider Info form in the back end, click Forms, Service Provider, View Data. Then click Add. Here is the top of the Service Provider form:
16
Note that Service Category is a Multi Select Database Join element. The Plus signs allow us to add new Categories on the back end but the plus signs are not present on the front end. So folks need to email us if they want to add a new city or category. Here is the rest of the Service Provider form:
17
The editor will enable Service Providers to add images, videos and links to web pages to help members better understand the services they offer.
Congratulations! You have now completed your Job Provider and Service Provider Info forms.
What’s Next? In the next article, we will set up front end menu items so we can add our Demo Members to test how well our new Job and Service Provider Network works.
In our last article, we finished the Fabrik Member Registration form and matched its elements to the default Joomla Registration form elements so that we can replace the Joomla Registration form with our custom Member Registration form. In this article, we will create our Job Provider and Service Provider forms.
Seven Steps to Become a Job Provider
We will create a separate form called Job Provider so we can handle Job Provider group permissions, display and access differently from our New Member Group permissions. Job Providers will first need to come to one of our meetings and fill out the Membership form. They will then need to go online and register as members – checking the box to be a Job Provider. They will then need to wait for their membership to be activated. They can then go back online and sign in with their Member username and password. They will then see a Job Provider menu where there will be the Job Provider Signup form that they will need to fill out. They can then click on the Job Provider List to confirm that they have been added to the List.
01
Create your Job Provider List, Form and Group
To create our Job Provider List, go to Lists and click New. For Label, type Job Provider. Then click on the Data tab. For Table name, type: ace_job_provider. Click Save. Leave the Content Type at Default. Click Save and Close. Then click the Job Provider Form to edit it. Click the Layout Tab. Change Show Title to No. Click Save & Close.
Add an Intro to the Job Provider Group
Rather than having the Job Provider Intro text at the beginning of the Job Provider form, it is better to place it inside the Job Provider Group. This will make it easier to hide this text on our Job Provider Profile Page. Here is the Job Provider Intro text:
The website field below is optional. The rest of the fields are required as they are using by our Network Search Engine. For Provider Name, indicate either the name of your business or your name and the name of your job. For email, please indicate your business email or your personal email. Select 1 to 3 Job categories. To select more than one category, hold down the Control Key. If you do not see your Job Category in the current options, email us to add a Category. You can use the Job Provider Profile box to provide more details about the job you are offering including images and videos. To add an image, simply click on the Image Icon in the editor. To add a link to another web page, click on the link icon. You can also change the font size and font color. Please read our article on how to create your own Provider Photo before you upload your Provider Photo.
Click Save. Because we do not want to show this description, and several other elements on the Job Provider Details page, click the Layout tab. Change Show in form/details from Yes to Yes but hidden (details only). Then click Save and Close. Here are the elements that will be in the Job Provider group:
02
Create a Job Provider Details Group
We need a separate group to hold our Job Provider Name, Email, Website, City, State and Profile elements. Go to Groups, click New and for Label, call the group Job Provider Details. For name, type job-provider-details. For form, select the Job Provider form. Leave the Intro box blank. Then click Save. Then click on the Layout tab. Note that Show in form/details is set for Yes. Leave it at Yes and click Save and Close. Here are the elements that will be in the Job Provider Details group:
03
Add Job Provider Name Box
Go to the Job Provider form and click Add to add our first element. First field: For Label, copy paste: Job Provider Name For Name, copy paste: job_provider_name. For Plugin, leave it at field. For group, select Job Provider Details. Then click Save and New.
Add a Job Provider Email Box
For Label, copy paste: Job Provider Email. For Name, copy paste: job_provider_email. For Plugin, leave it at field. For group, leave it at Job Provider Details. Then click on the Advanced tab and for Input type, select Email. Then click Save and New.
Add a Job Provider Website Box
For Label, type Job Provider Website. For Name, type job_provider_website. For plugin, leave it at Field. For Group, select Job Provider Details. Then click on the Advanced tab and change Input type to URL. Then click the Guess Link tab and change Guess Link Type to Yes and change Link Target to Open in a new window. Then click Save and New.
Add a Job Provider City box
For Label, type Job Provider City. For Name, type job_provider_city. For plugin, leave it at Field. For Group, select Job Provider Details. Then click Save and New.
Add a Job Provider State box For Label, type Job Provider State. For Name, type job_provider_state. For plugin, leave it at Field. For Group, select Job Provider Details. Then click Save and Close.
Add Job Category Form
We still need to add 2 more elements to our Job Provider Info form. These are Job Category and Job Provider Profile Page. However, because they have several options and may have more over time, and we want these to be searchable, we first need to create a special Job Category list and form. Because the Job Category needs its own custom form, we will add the Job Category element to our Job Provider form AFTER creating this special list and form.
Add a Job Categories List and Form
We want to have the ability to add a new Job Provider category if needed. The easiest way to do this is to create a Job Categories List which will also create a Job Categories form. The Job Categories form will only have one group called Job Categories. We will then add one element called Job Category Name. Then in Forms or List, click View Data to add the Category Names.
To add the Provider Categories List, click on Lists, New. For Label, type: Job Categories. Then click on the Data tab and for Table name, type: ace_job_categories. Click Save. Leave the Content Type at Default and click Save and Close.
Then click on the Job Categories form. For Intro, copy paste: This is a list of our job categories that can be searched by members looking for a job. Contact us if you want to add a new category.
Then click Save and Close.
Add a Job Category Name Element to the Job Category Form
In Fabrik Forms, click on Job Categories Add to add a new element. For the Label, type Job Category Name. It will automatically add a Name with the same text but in lower case with no spaces. Also remember to change the group to the Job Categories group. Then click Save and Close. Then go to Elements and change the Filter, Form to Job Categories. Then to the right of the new element, click Show in List. Also hide the ID and time elements from the list.
Add Categories to the Job Category List
In Forms or List, in the Job Category row, click View Data. Then click Add in the upper left corner to add the Category Names.
04
Type in our first category, Accounting. Then click Save and Add to add each remaining category. This is where we will add our initial 40 Service Provider categories (we can always add more later).
Accounting
Alternative Medicine
Bookkeeping
Business Services
Cafes and Restaurants
Car and Truck Repair
Carpentry
Childcare
Church Religious Spiritual
Computer Repair
Construction/Contractor
Cosmetic and Hair Styling
Counseling
Dental Services
Electrician
Entertainment
Farmer
Food
Gardening and Seed Sharing
Health and Wellness
Hotel and Shared Housing
Landscaping
Legal Aid
Media and Video Production
Mentoring
Nonprofit Group
Nurse
Painter
Plumber
Teacher
Tourism and Travel
Transportation
Veterinary and Animal Care
Volunteer
Website Services
Other Please Add
Here is what the top of our finished list looks like:
05
Add a Database Join Element to Connect our Job Provider Form to our Job Category form
Go to Forms, Job Provider form row. Then click Add to add a new element. For Label, type Job Category. For Name, type job_category. For plugin, select database join. For group, select Job Provider. Then click on the Data tab. Change Render As from Drop Down to MultiSelect DropDown. For table, select Job Categories. For Value, select ID. For label, select Job Category Name.
06
Then click on Add option in front end. Change Add option in front end from No to Yes. Then click Save to confirm the Job Categories form was found for the Popup form.
07
Then click Save and New.
Add a User ID element
For Label, type UserID. For name, type userid. For plugin, select User. For group, select Job Provider. For Show, change it to Hidden. Then click Save and New.
Add a Job Provider Profile Box with Editor
Next, add a Job Provider Profile box. For Label, type Job Provider Profile. For name, type job_provider_profile. For plugin, select textarea. For Group, select Job Provider Details. Click the Layout tab and change width to input-xlarge and Height to 30. Click the Advanced tab and change Show Label to Yes. WYSIWYG Editor to Yes, Extended buttons to No and Data to 16MB.
08
Then click Save and Close.
Select the elements to display in the Job Provider List
Click Fabrik Elements. Then filter for the Job Provider form. Move the Job Provider City to the top of the list. For show in list, leave everything unchecked except City, Name and Category.
View the Job Provider Form
To View the Provider form in the back end, click Forms, Job Provider View Data. Then click Add. Here is the top of the form:
09
Seven Steps to become a Service Provider
The steps for Service Provider are similar to Job Provider:
10
Create a Similar Service Provider List and Form
To create our Service Provider List, go to Lists and click New. For List Label, type Service Provider. Then click on the Data tab. For Table name, type: ace_service_provider. Click Save. Leave the Content Type at Default. Click Save and Close. Then click the Service Provider Form to edit it. Click the Layout Tab and change Show Title to No. Then click Save and Close.
Add an Intro to the Service Provider Group
Rather than having the Service Provider Intro text at the beginning of the Service Provider form, it is better to place it inside the Service Provider Group. This will make it easier to hide this text on our Service Provider Profile Page. Here is the Service Provider Intro text:
The website field below is optional. The rest of the fields are required as they are using by our Network Search Engine. For Provider Name, please indicate either the name of your business or your name and the name of your service. For email, please indicate your business email or your personal email. Select 1 to 3 Service categories. To select more than one category, hold down the Control Key. If you do not see your Service Category in the current options, email us to add a Category. You can use the Service Provider Profile Box to provide more details about the service you are offering including images and videos if you wish. To add an image, simply click on the Image Icon in the editor. To add a link to another web page, click on the link icon. You can also change the font family, font size and font color. Please read our article on how to create your own Provider Photo before you upload your Provider Photo.
Elements in the Service Provider Group
11
Create a Service Provider Details Group
We need a separate group to hold our Service Provider Name, Email, Website, City and State elements. Go to Groups, click New and for Label, type Service Provider Details. For name, type service-provider-details. For form, select the Service Provider form. Leave the Intro box blank. Then click Save. Then click on the Layout tab. Note that Show in form/details is set for Yes. Click Save and Close.
Elements in the Service Provider Details group
12
Create a Service Provider Profile Group
We need a separate group to hold our Service Provider Profile element. Go to Groups, click New and for Label, type Service Provider Profile. For Name, type service-provider-profile-page. For form, select the Service Provider form. Then click Save and Close.
Add Service Provider Name Box
Go to the Service Provider form and click Add. For Label, copy paste: Service Provider Name For Name, copy paste: service_provider_name. For Plugin, leave it at field. For group, select Service Provider Details. Then click Save and New.
Add a Service Provider Email Box
For Label, copy paste: Service Provider Email. For Name, copy paste: service_provider_email. For Plugin, leave it at field. For group, leave it at Service Provider Details. Then click on the Advanced tab and for Input type, select Email. Then click Save and New.
Add a Service Provider Website Box
For Label, type Service Provider Website. For Name, type service_provider_website. For plugin, leave it at Field. For Group, select Service Provider Details. Then click on the Advanced tab and change Input type to URL. Then click the Guess Link tab and change Guess Link Type to Yes and change Link Target to Open in a new window. Then click Save and New.
Add a Service Provider City box
For Label, type Service Provider City. For Name, type service_provider_city. For plugin, leave it at Field. For Group, select Service Provider Details. Then click Save and New.
Add a Service Provider State box For Label, type Service Provider State. For Name, type service_provider_state. For plugin, leave it at Field. For Group, select Service Provider Details. Then click Save and Close.
Add Service Categories List and Form
Make a new List identical to the Job Categories List but called Service Categories with the Table name ace_service_categories Then click Save. Then Save and Close.
Add an element to this form called Service Provider Category. Place it in the Service Categories group. Then click Save and Close. Then hide the time and ID elements from the List and show just the Service Provider Category. Then go Go to View Data Add to add all of the categories we previously added to the Job Categories List.
Add a Database Join Element to Connect our Service Provider Form to our Service Category.
Go to Forms, Service Provider form. Then click Add to add a new element. For Label, type Service Category. For Name, type service_category. For plugin, select database join. For group, select Service Provider. Then click on the Data tab. Change Render As from Drop Down to MultiSelect DropDown. For table, select Service Categories. For Value, select ID. For label, select Service Category. Then click on Add option in front end. Change Add option in front end from No to Yes. Then click Save and verify the Popup. Then click Save and New.
Add a Service Provider Image Upload Element
For Label, type Provider Photo For name, type: provider_photo
For plugin, change it to fileupload. For group, leave it at Service Provider Details. Image settings have 8 tabs. Here are the first 7:
13
On the Options tab, reduce Maximum File Size to 200. Then change the upload directory to: /images/members/{$my→username} Then click Save & Close.
To insure providers can load images, go to Content, Media, Options and copy the Legal image extensions:
bmp,gif,jpg,png,jpeg,webp,avif
Then close the Media screen and go to the Provider Photo element to edit it. Paste these extensions in the Allowed File Type box.
Then click the Ajax Uploads tab and change Use Ajax Upload fro No to Yes. Then click Save and Close.
We will also write an article about how to create, resize, crop and upload a Provider Photo for the Service Provider menu.
Add a User ID element
For Label, type UserID. For name, type userid. For plugin, select User. For group, select Service Provider. For Show, change it to Hidden. Then click Save and New.
Add a Service Provider Profile Box
For Label, type Service Provider Profile. For name, type service_provider_profile. For plugin, select textarea. For Group, select Service Provider Profile. Click the Layout tab and change width to input-xlarge and Height to 30. Click the Advanced tab and change Show Label to Yes. WYSIWYG Editor to Yes, Extended buttons to No and Data Type to 16MB. Then click Save and Close.
Select the elements to display in the Service Provider List
Click on Fabrik Elements. Then filter for the Service Provider form. Move the Service Provider City to the top of the list. For show in list, leave everything unchecked except Service Provider City, Service Provider Name and Service Category and Provider Photo.
Set Access to the Edit Icon for the Service Provider List
To prevent the public from being able to edit the Service Provider List, we need to change the access to the Edit icon. Go to Lists, Service Provider, Access and change it to the following:
14
Also change Job Provider Access to the same except set view list and view records to Registered instead of Public:
15
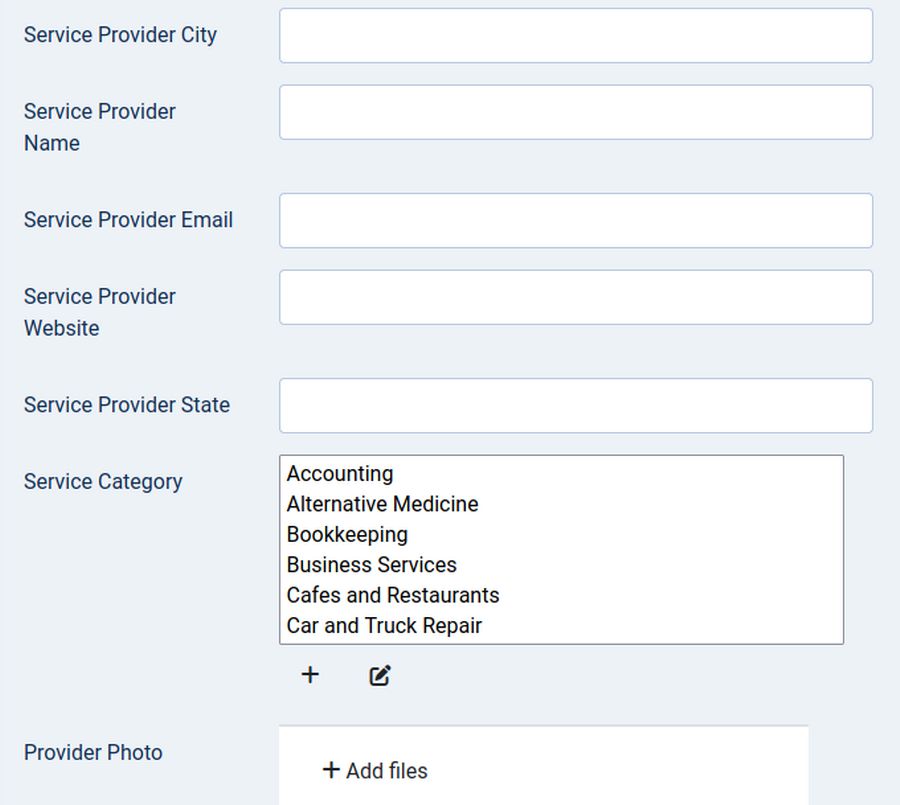
View the Service Provider Info List To View the Service Provider Info form in the back end, click Forms, Service Provider, View Data. Then click Add. Here is the top of the Service Provider form:
16
Note that Service Category is a Multi Select Database Join element. The Plus signs allow us to add new Categories on the back end but the plus signs are not present on the front end. So folks need to email us if they want to add a new city or category. Here is the rest of the Service Provider form:
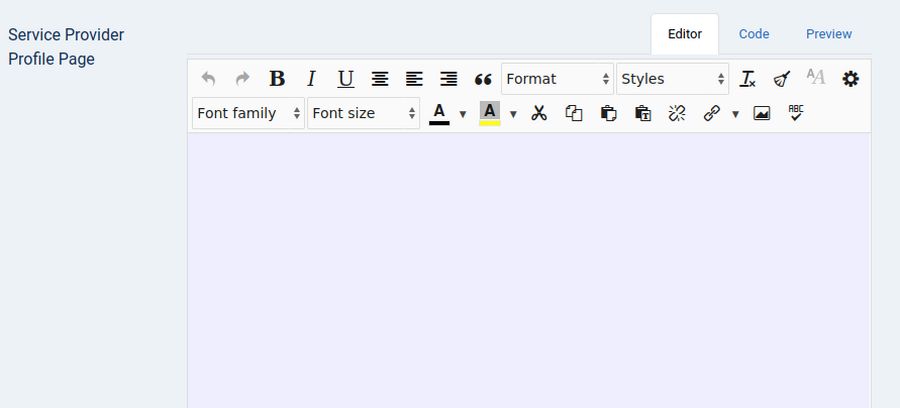
17
The editor will enable Service Providers to add images, videos and links to web pages to help members better understand the services they offer.
Congratulations! You have now completed your Job Provider and Service Provider Info forms.
What’s Next? In the next article, we will set up front end menu items so we can add our Demo Members to test how well our new Job and Service Provider Network works.